Reviving a Dead Spider-Man Game
In 2023 I set out to reverse engineer Spider-Man Unlimited - a mobile runner game that I loved as a kid, but which had been dead since servers shut down years ago. I had almost no experience with mobile security or reverse engineering when I started, but over months of digging I cracked the game’s encrypted save format, bypassed its file integrity checks, and even built a mod menu that lets players access content that had been lost to time. By the end, I’d not only brought a dead game back to life but figured out enough about its level format to enable custom mission creation.
Context
Game’s Revival
When I wrote my first blog about this game, the game was barely playable. Players could run an old APK version on Android after jumping through hoops, but the Spider-Man community was frustrated about losing this piece of gaming history. My initial Frida cheat script helped make the game more playable, and something unexpected happened - the community exploded. The Spidey-Hub Discord grew to nearly 40 thousand members, YouTube videos about the game’s revival hit millions of views, and suddenly a decade-old mobile game had a thriving modding scene.
Outstanding Issues
But that Frida script was just the beginning. I had barely taken a mobile security course when I wrote it, and the game’s latest versions still had major problems blocking its revival:
- Progression was completely broken without online servers
- Game assets were locked behind proprietary compression
- File integrity checks prevented any asset modifications
After gaining more experience in mobile security, I came back to tackle these challenges. What follows is how I cracked them all open - and discovered even more possibilities for modding than I initially imagined.
Save Game Decryption
The main reason game version 4.6.0c is not properly playable is its completely broken progression system - you cannot gain currency, purchase new characters, or upgrade your existing inventory. Early in the story you hit a wall that can only be overcome with higher inventory power, which is impossible to increase. All these values were stored locally without server validation, so if we could modify the save files, we could bring this version back to life.
Simply through the process of elimination (deleting files one by one till I see the save reset) I discovered that the Android version of the game stored its save data inside the player.dat file located in the application’s data folder. Unfortunately for me, the contents were incomprehensible, indicating some sort of encryption or obfuscation:
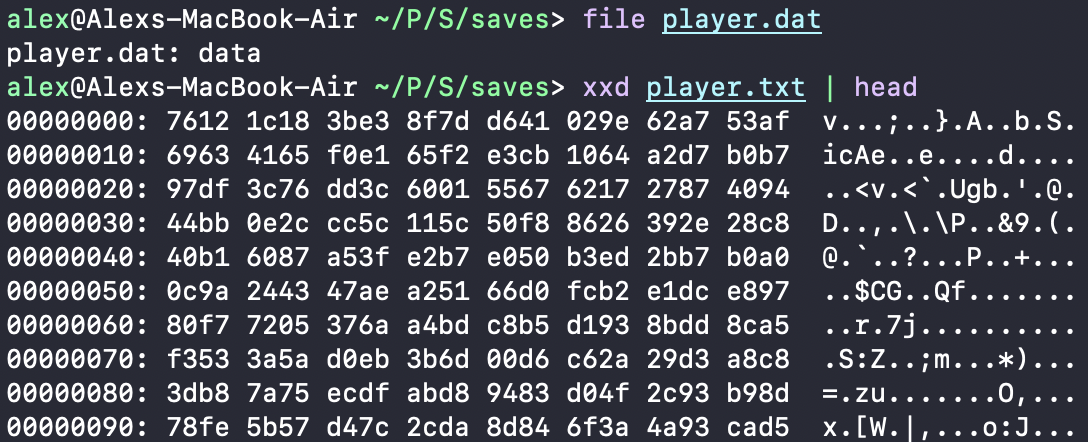
I understood the task at hand and loaded up the game binary inside of Binary Ninja.
Deserialization
One notable difference I immediately noticed when analyzing the binaries for the latest game version, versus the old one I looked at first, was the presence of debug symbols - descriptive names for functions, variables, and data types that developers use while building the game. These names are typically stripped away in the final release to reduce file size and make reverse engineering harder, leaving us with meaningless labels like sub_1234. I can only guess that obfuscation wasn’t as big of a priority at the end of the game’s lifecycle. These symbols proved to be a goldmine, as seeing identifiers like JsonKey::Inventory, JsonKey::Profile, and JsonKey::Inbox immediately revealed that the save file used JSON format. This also aligned with my previous research showing Gameloft exclusively used XML or JSON for their save files.
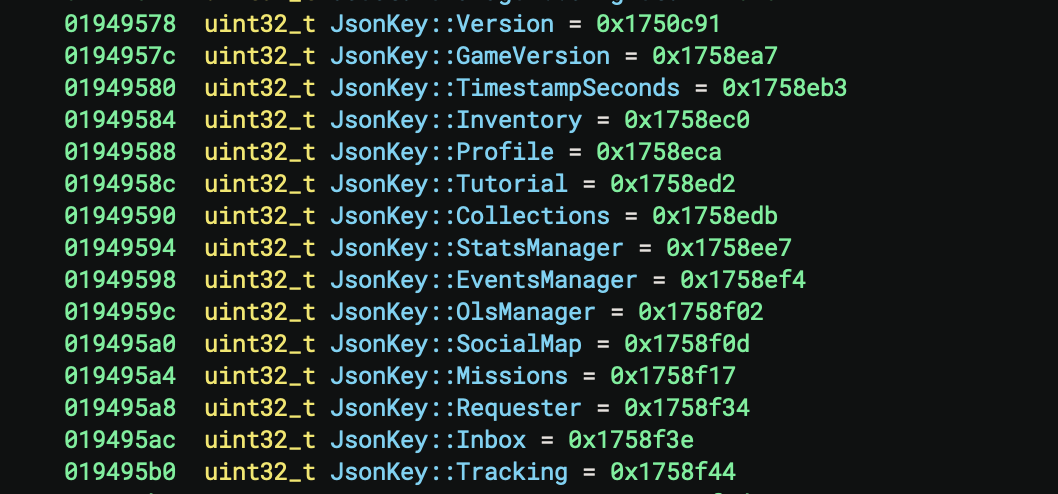
Conveniently, most of these JsonKey symbols appeared exclusively in two functions throughout the binary, leading me to a key insight: they were used specifically for save file handling - serializing game state to disk and deserializing it back into memory. The deserialization process converts structured data, in this case JSON, back into C++ objects and data structures that represent the game’s state. Each JsonKey serves as a identifier to reconstruct specific save game values - from player inventory to mission progress. From these 2 functions alone we could reconstruct the entire save game format to roughly be this:
{
   JsonKey::Version,
   JsonKey::TimestampSeconds,
   JsonKey::Tutorial,
   JsonKey::Inventory,
   JsonKey::Profile: {
       JsonKey::Collections,
       JsonKey::StatsManager,
       JsonKey::EventsManager,
       JsonKey::OlsManager,
       JsonKey::SocialMap,
       JsonKey::Missions,
       JsonKey::Requester,
       JsonKey::Inbox,
       JsonKey::Tracking
   },
   JsonKey::GameVersion
}
Now that I knew how the plaintext save file contents were deserialized, the biggest challenge was to find where exactly the encrypted player.dat contents became readable JSON that could be parsed by the DeserializeSave function. Function sub_5fd354 stood out because its invocation of DeserializeSave was gated behind multiple buffer operations and a status check - a pattern that screamed “decryption”:
if (sub_2468b8(&buffer1, &buffer2)) {
    pointer1 = &retval;
    buffer1 = buffer2;
    buffer2 = 0;

    sub_1376fb8(pointer1, 0);
    int32_t flag1 = sub_5fb6d4(pointer1, &buffer1, &retval);
    arg2->status = (int8_t)flag1;

    if (flag1 == 1) {
        DeserializeSave(arg2, &retval, 0);
    }
}
Since we know that DeserializeSave reads plaintext data at the location of its second argument (&retval in this case), we can trace backwards to find where this data comes from. Following retval backwards:
- It’s passed into
DeserializeSaveifflag1 == 1 - It receives output from
sub_5fb6d4 sub_5fb6d4takesbuffer1as inputbuffer1gets its data frombuffer2- And
buffer2is populated bysub_2468b8(&buffer1, &buffer2)
Decryption
Everything points to sub_2468b8 as the likely decryption function, because the logic branches based on its execution - we only start parsing JSON if this function is successful, and its output is directly fed into the functions that perform the deserialization. Knowing this, I dug deeper into sub_2468b8, and noticed that one function call stood out based on the number and type of arguments it was invoked with:
sub_129d1c4(
	(char*)buffer1Pointer + 0x10,
	buffer1Length - 0x10,
	newBuffer,
	buffer1Length - 0x10,
	sub_11cefd0(&somePointer)
)
First off, we know that buffer2 held the decrypted save game contents, which were then passed to the deserialization function. It’s therefore obvious that buffer1 most likely held the actual encrypted data. And in this invocation we can see that the contents and length of buffer1 are passed as arguments, alongside a newly allocated buffer, which is allocated to be the same length as buffer1 minus 16 bytes. We will come back to the significance of these 16 bytes later, but for now its becoming clear that we have found a candidate for the decryption function.
Static analysis could only tell us so much - to really confirm this was the decryption routine, I needed to see what data was flowing through it. Enter Frida - an incredibly powerful tool that lets you write extensive dynamic analysis routines using a simple JavaScript API. Hooking unexported native code with Frida is still an underdocumented process, so let me explain the basic steps necessary for performing it:
First, we need to dynamically find the target library in the process using its name and the Frida findModuleByName method of the Process object:
const libModule = Process.findModuleByName("libSpidermanI.so");
Once we have the library, we need to figure out where the target function is located. In the case of an exported function we can use findExportByName method, but in our case the function is not exported, therefore we need to use its offset in the library, which is easily obtained from your disassembly tool of choice. Once we have it, we simply add the offset to the base address of the library:
const functionAddress = libModule.base.add(0x0129d1c4);
We are now ready to intercept calls to the target function. Frida’s Interceptor API gives you the option of hooking at the function entry (onEnter), and at the function exit (onLeave). The function sub_129d1c4 takes an empty buffer as its third argument, therefore it wouldn’t make sense for us to hook at the function entry, since all we will see inside of the buffer is garbage. Thankfully Frida provides its own hexdump function, allowing me to dump the third argument’s bytes along with their string representations within the onLeave Interceptor method:
Interceptor.attach(functionAddress, {
	onEnter(args) {
		// Executed when the function is entered
	},
	onLeave(retval) {
		console.log(hexdump(this.param_3, {
			offset: 0,
			length: Math.min(this.param_2, 128),
			header: true,
			ansi: true
		}));
	}
}
I then executed the resulting Frida script while starting the game on my phone and saw strings that clearly resembled what we understood as the save game format during the deserialization section, including values such as GameVersion, Inventory, and EventsManager:

Next up, I needed to know where the decryption key was coming from. I began tracing the origin of the last argument to the decryption function, and at some point noticed that its byte value was being derived from a base64 string:

Now clearly, this is a sign that i’ve spent way too much time working on this game, because I immediately recognized this value as one that i’ve seen before within the game files. So you may remember that the player.dat save file is located inside the files folder of the /data/data/com.gameloft.android.ANMP.GloftSIHM/ directory, but the game also uses the databases folder within that data location. And one of the SQLite databases contained inside is gameloft_sharing, which has this exact base64 payload:

The use of a GLUID (Gameloft User ID) value is consistent with other known save game encryption mechanisms implemented by Gameloft, for example their old MyLittlePony game reversed by roundcube3. The Gameloft User ID value is ultimately derived from the device’s IMEI - a unique identifier assigned to every mobile device - which is hashed before being stored in the game’s database.
Technically, knowing which exact function decrypts the save file is already enough for succesful cheating - we can simply write a Frida script to hook this function and edit our inventory within the string before passing it back to the game. However, that wouldn’t be fun, and relying on Frida makes it difficult to have a working cheat that can be executed across a variety of devices, emulators and process architectures, as you will see later on.
Algorithm
We know what key the game uses for decryption, but before we can write a working save game editor we need to understand the algorithm that is being used. Now I’m no comp-sci major nor am I versed in low-level cryptography details, but there are some key details I understood by statically analyzing the decryption function:
- Contains unique constant values:
0x9e3779b90x61c88647
- Works on 32-bit chunks of data
- Processes data in pairs (64-bit blocks)
- Runs exactly 32 rounds
The answer to the question of “which algorithm” is quite literally on the first page of Google:
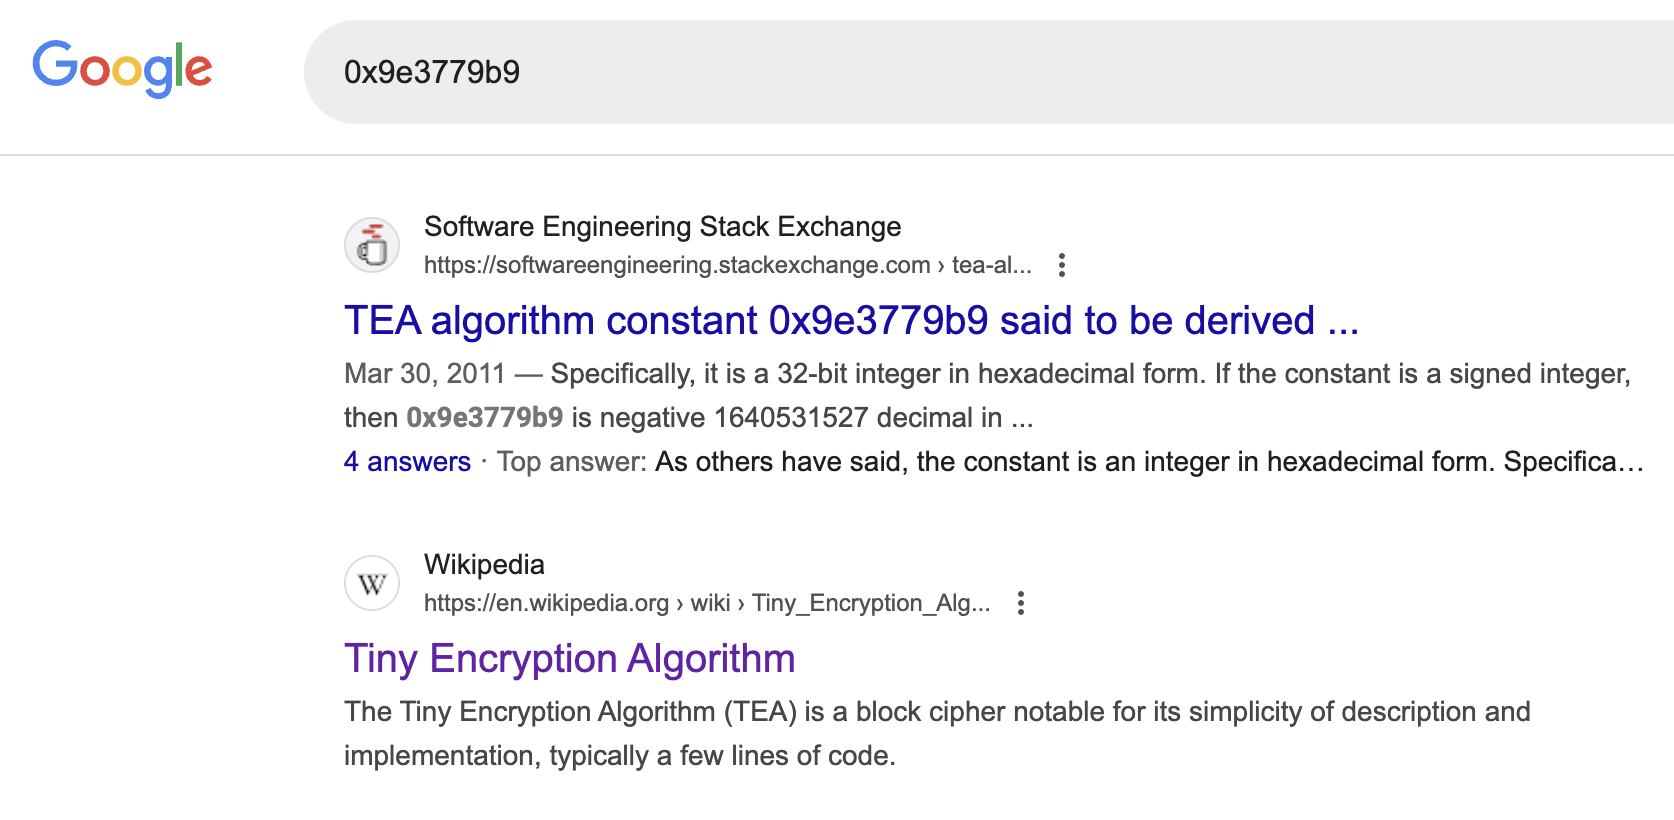
In short, within a TEA decryption routine the input data is processed in 32-bit blocks using a 128-bit key (4 x 32-bit words). For each block, the routine runs 32 rounds of decryption, using a consistent delta value (0x9e3779b9) that decrements each round. Each round combines the current block with the key using a mix of bit shifts, XOR operations, and addition/subtraction. And this perfectly matches what we see within our disassembly.
I had Claude reimplement the exact routine used by the game in Python for maximum consistency, however in the end I discovered that there was no meaningful cryptographic difference in the disassembled function from standard TEA. Therefore, I could also just use off-the-shelf TEA libraries for encryption/decryption and save game editing.
Now I finally had a working script that could take the contents of player.dat past the first 16 bytes and TEA decrypt it into plaintext using a key retrieved from the gameloft_sharing SQLite database:

Hashing
We could edit the decrypted contents and re-encrypt them, but the game would wipe the save file without the 16 byte header, and zeroing out the header wouldn’t pass either. The persistence of these 16 bytes across different saves on the same device was a crucial clue - if it was a checksum of the save contents, it would change whenever the save changed. Whatever this header was, it had to be tied to something device-specific. I traced back the execution within Binary Ninja to find what makes an acceptable value for these 16 bytes and stumbled upon the function sub_12af9e8 that was using a vast amount of magic constant values, likely indicating some sort of cryptographic operation:
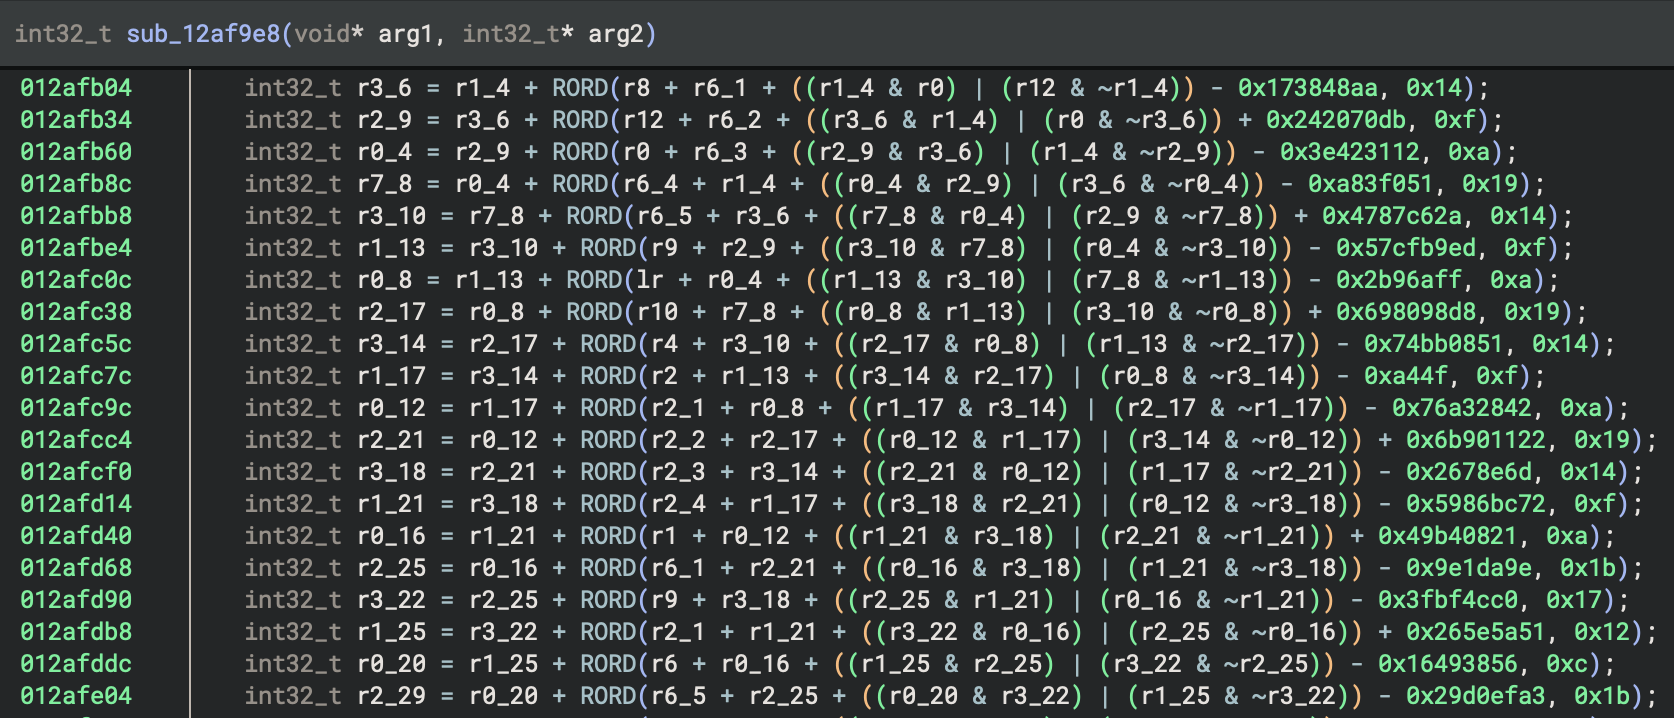
Just like with TEA, the constants came in clutch and quickly answered my question:
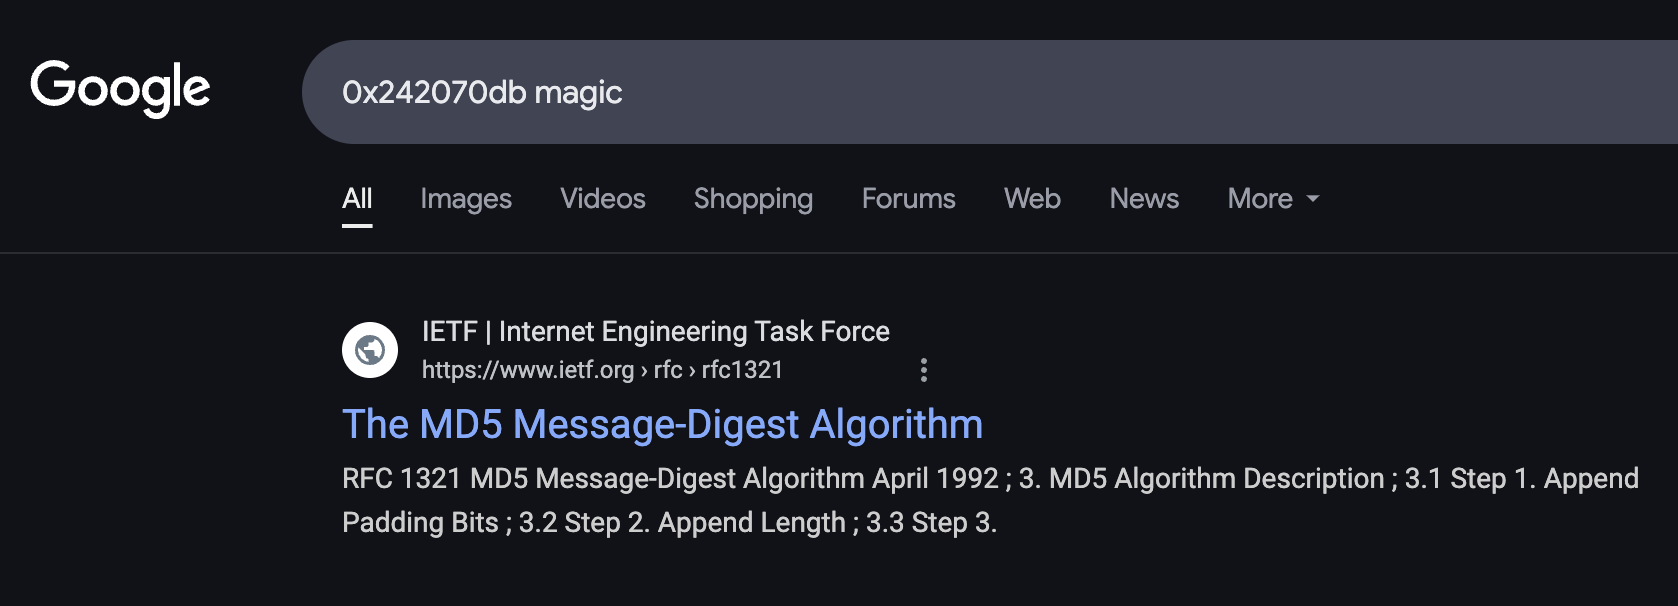
I modified my previous Frida script to hexdump the arguments to this MD5 hashing function and quickly recognized the bytes of my GLUID encryption key, which made perfect sense - if it was the save file contents being hashed, the hash would change every time the save changed, but it stayed static both after gameplay changes and even through save file deletion and re-creation on the same device. This was the final missing piece of the puzzle.
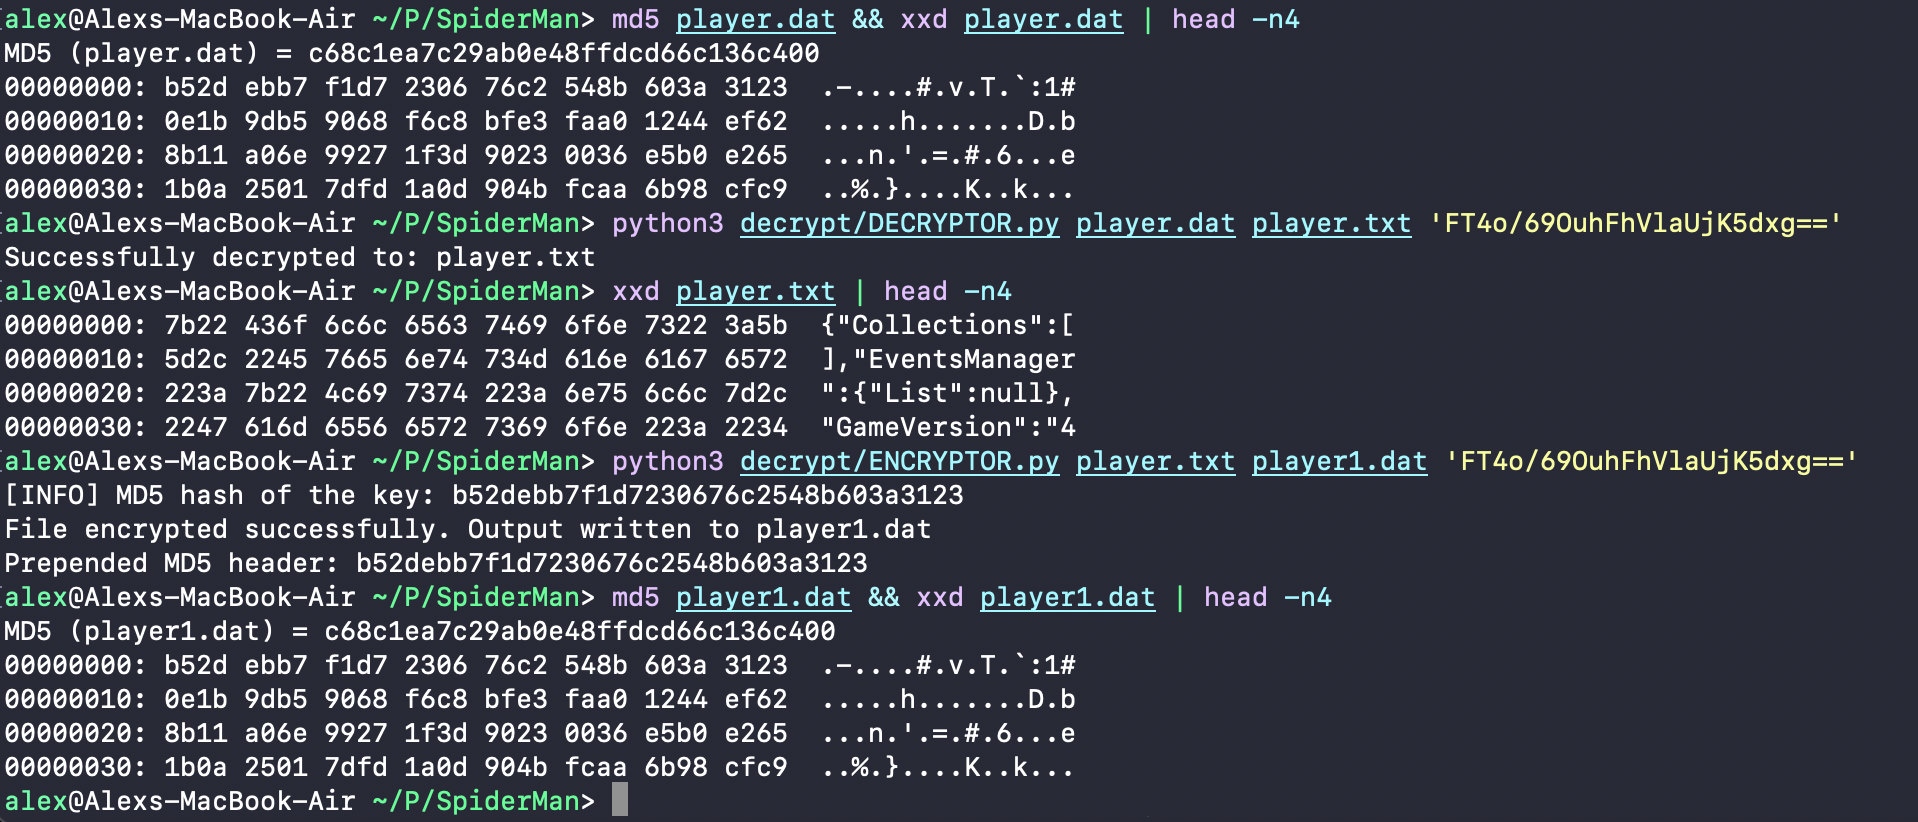
To confirm that I could perfectly repeat the save game decryption and encryption process I took a player.dat file from my phone, got its hash, decrypted it, re-encrypted it, and attached the 16 byte header with my script - the resulting file’s hash was a match:
Save Editing
Once I had a working set of scripts that could decrypt and encrypt save files, I set my sights on the actual save file contents. I did not care to edit the currency values, since the game’s purchasing functionality was all broken without servers, but the costume inventory interested me a lot. The existing costumes were listed in the inventory with the following format:
"Costume_Amazing_C:1:1:1734076400:2.000000,114064793,20"
"Costume_SecretWar_C:0:2:1734312851:3.000000,114064793,20"
The format of costume records was pretty easy to guess based on the existing values for the default costumes. This included most importantly the costume name, experience, stars rating, power multiplier and energy level. The tricky part was finding valid costume names - wrong names would likely crash the game or get rejected. Thankfully, the later game versions all used the GameData.json file that declared and configured a lot of the game systems, including the playable costumes:
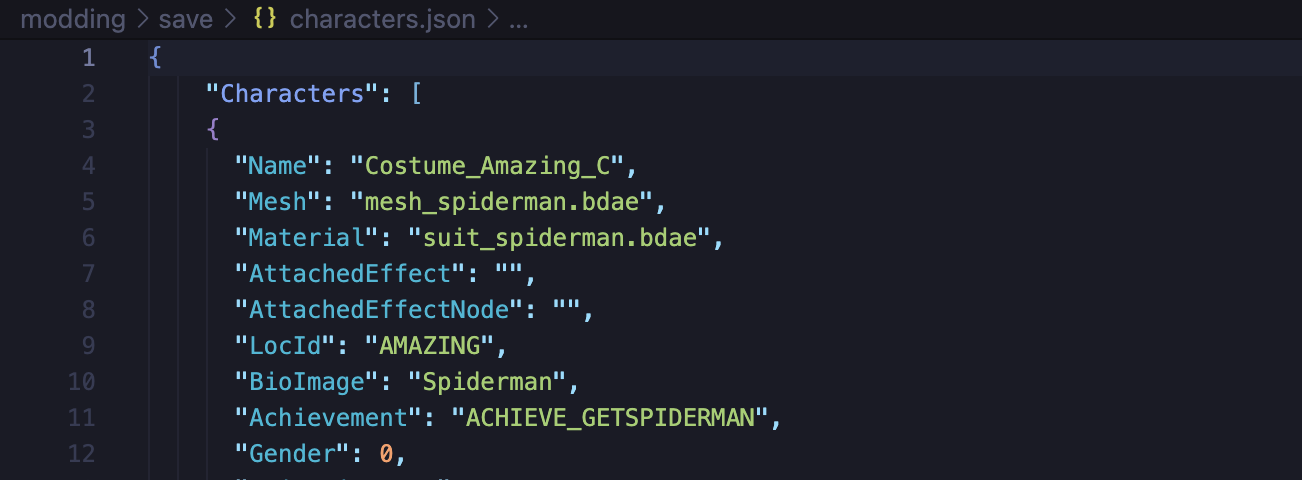
I extracted all unique character name values from this file and wrote a quick Python script to populate my save file with all of them, changing only the rarity value and keeping the rest at default:
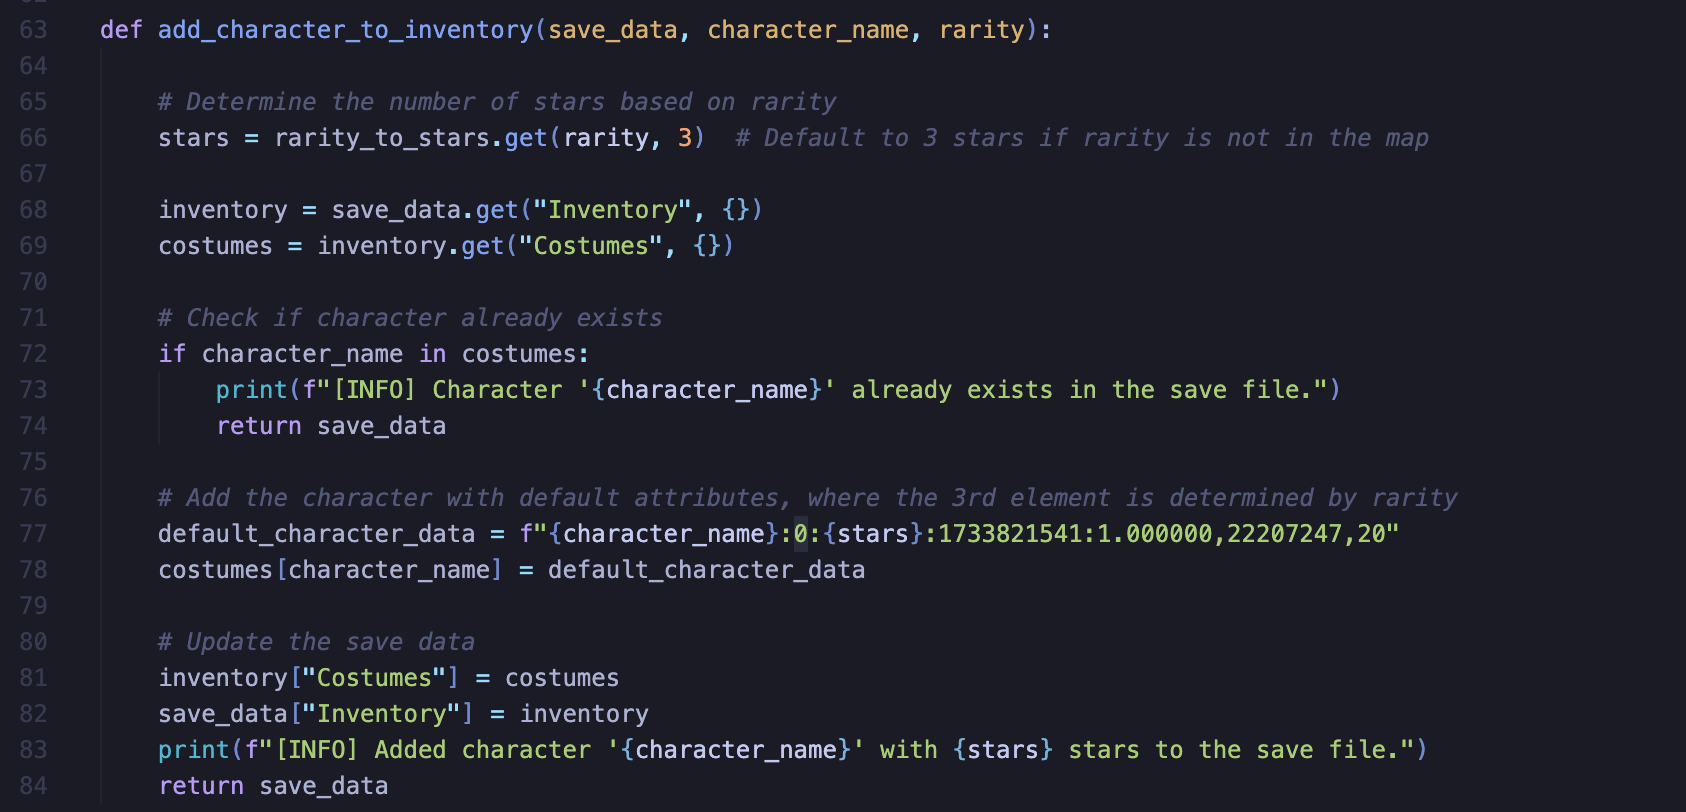
After re-encrypting my modified save file I booted into the game without issue, and was pleasantly surprised to see that not only was the save not wiped, but that all 427 costumes were now in my inventory:
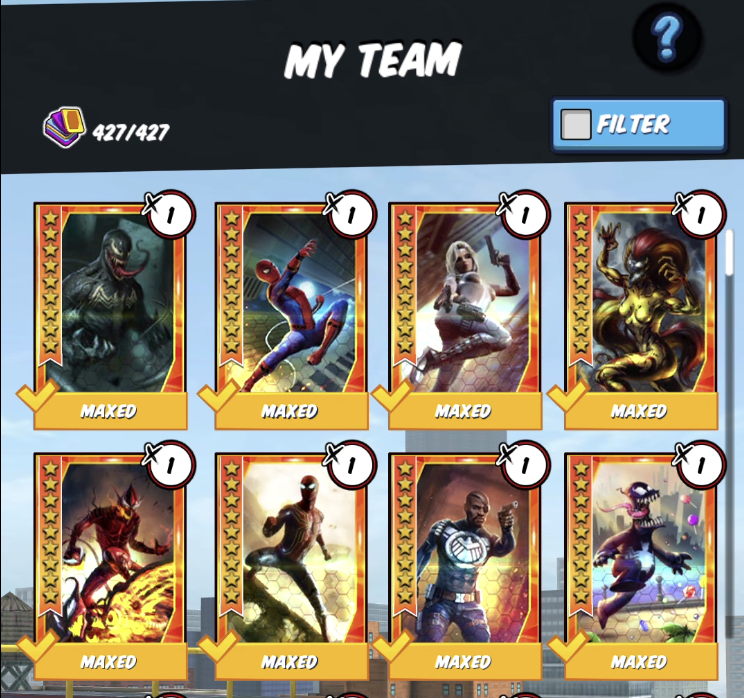
Before this, we had dozens of costumes that were potentially lost to time - unless you had them unlocked during the lifespan of the game, which ended 6 years ago, you could never unlock them. But now you can, and this previously unplayable game version is fully playable thanks to this. And we aren’t done yet.
Evading File Integrity
Spider-Man Unlimited 4.6.0c mainly used the phone SD card for the storage of its game assets such as models, textures, levels, translation files, etc. And I’ve already mentioned GameData.json, which configured a tremendous amount of game systems. So making game mods should have been as simple as editing these files, but there was a huge roadblock - file integrity checking. The game would re-download everything at the sight of even the slightest modification of any files.
Secret Configuration
There was a key detail in the way the game handled its assets. Specifically, most of the game functionality was contained inside libSpidermanI.so, which was shipped with the APK, but the APK wouldn’t execute the library until after it downloaded the assets. Therefore, it meant that this integrity checking was happening inside the game’s Java code, simplifying reverse engineering significantly, since we can easily take apart an APK and decompile its Dalvik bytecode into Java using jadx. I did exactly that and started analyzing the GameInstaller.java file.
Interestingly enough the GameInstaller class would check for the presence of the qaTestingConfigs.txt file on the SD card at every game start. Even more interesting were the values it was supposedly retrieving from this file:
getInjectedOverriddenSettings("qaTestingConfigs.txt", "SKIP_VALIDATION");
getInjectedOverriddenSettings("qaTestingConfigs.txt", "PRINT_QA_LOGS");
getInjectedOverriddenSettings("qaTestingConfigs.txt", "WIFI_MODE");
getInjectedOverriddenSettings("qaTestingConfigs.txt", "OUTPUT_AF_REVISION");
getInjectedOverriddenSettings("qaTestingConfigs.txt", "DATA_LINK");
Back in 1.9.0f I found an entire cheat menu that the developers forgot to remove from the game’s binaries, but in 4.6.0c that menu was notably missing. But clearly, some debug functionality still slipped by into production, as indicated by these QA configurations. Some of these were pretty basic, such as DATA_LINK, which simply set the URL to download the game assets from, or OUTPUT_AF_REVISION, which would print the version of the Android Framework. But the real zinger was SKIP_VALIDATION. Based on its name I assumed it meant file validation, and there was no better way to test it other than creating the qaTestingConfigs.txt file on disk with the following content:
SKIP_VALIDATION=1
I changed a single character inside GameData.json and booted into the game with qaTestingConfigs.txt in my game’s SD card folder. And just like that, whatever integrity validation the game previously performed, was gone - the modified GameData.json contents stayed intact and the game did not re-download the assets.
Patching Strings
Now that there was nothing stopping me from modifying the game files, I wanted to first see if I could modify the text that appears in the game. The first step to achieving that was finding where this text was defined. The game stored its SD card assets inside generic .dat files with incrementing numbers like file0000000. Thankfully, there was also a file named file00000-plantext.dat that mapped these cryptic filenames to their actual contents:
file000002.dat actors.bar -755215770
file000003.dat props.bar -1053354621
file000011.dat fonts.bar 1095549135
file000013.dat actors2.bar 2031997239
file000016.dat effects.bar -1008568933
file000021.dat spiderman_strings.bar 891628681
file000022.dat environments.bar -1230308759
file000037.dat levelSegments.bar 1891110873
file000040.dat fx.bar 1649654815
file000044.dat levels.bar 176600618
file000053.dat swfsLoad.bar -1925919318
file000060.dat ps.bar -1144572495
Since we are interested in modifying strings, spiderman_strings.bar (file000021.dat) was the correct file. I checked the file header and saw FWS (Shockwave Flash) as the magic bytes, but that was not consistent with the end of the file. The end closely resembled a table-of-contents section present inside of ZIP archives, and moreover, the PK magic bytes were visible within, including filenames:
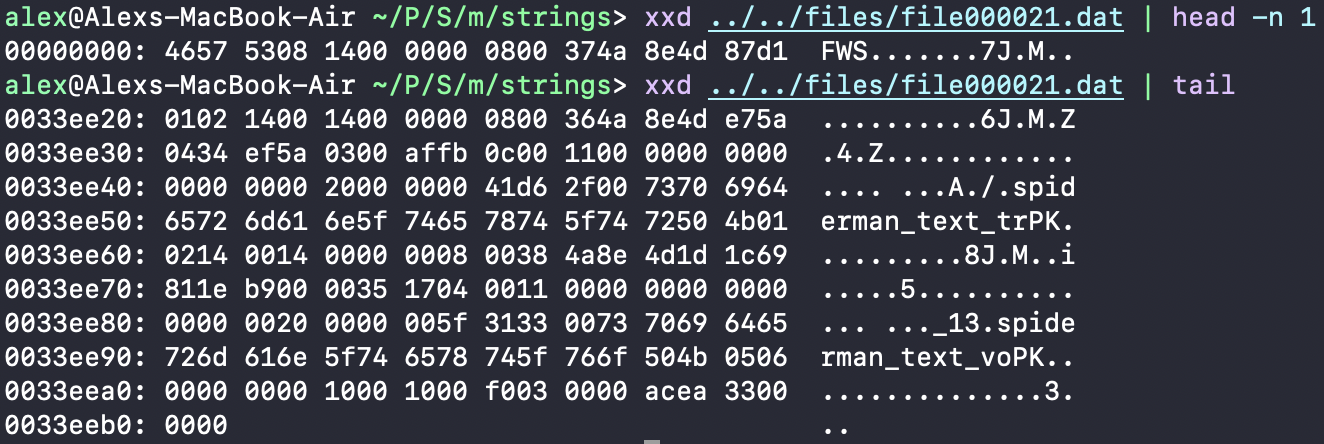
The archive wouldn’t budge to a regular unzip command, so I used the Mac 7-zip CLI:
7z e file000021.dat
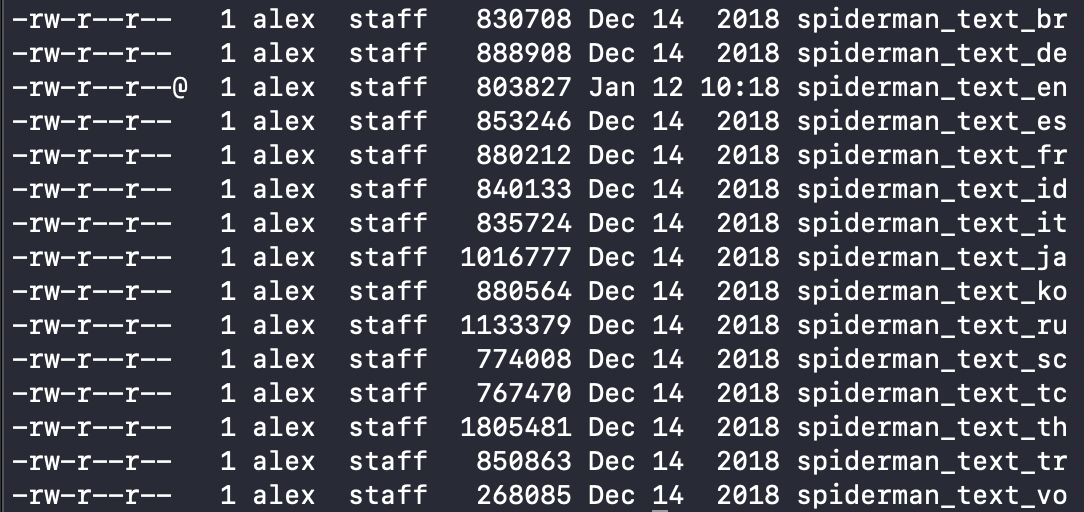
The file contents were all then extracted and I could see all the translations supposed by the game:
I ran hexdump against the spiderman_text_en file and noticed that the file had a combination of human-readable strings and bytes in-between. The structure is quite easy to understand if you break it down:
1D000000 MAINMENU.Continue.btntxt.text 06000000 REVIVE 0A
21000000 MAINMENU.SinglePlayer.btntxt.text 06000000 SINGLE 0A
20000000 MAINMENU.Multiplayer.btntxt.text 0B000000 MULTIPLAYER 0A
Let’s look at the values for the first record - 1D000000 and 06000000. If we convert these hex values to decimals, we will get very large numbers that do not immediately seem to have significance to us - 486539264 and 100663296. These large numbers are unlikely to represent meaningful values in this context. This is because we’re reading the bytes in the wrong order. If we read the bytes from left to right (little endian), we will get 29 and 6. This is common in reverse engineering because many systems (x86, ARM) use little-endian byte ordering for their integers. When looking at raw hex dumps or memory values, we need to be aware of the endianness or we’ll misinterpret numeric values.
So the string MAINMENU.Continue.btntxt.text is preceded by 29, which also happens to be the character count of the string, and REVIVE is preceded by 6, which again, is the string character length. This pattern is repeated for every string in this file, so we now know that this is the record format for the file:
[Key Length (4 bytes, little endian)]
[Key string (e.g. "MAINMENU.Continue.btntxt.text")]
[Value Length (4 bytes, little endian)]
[Value string (e.g. "REVIVE")]
[Newline byte (0x0A)]
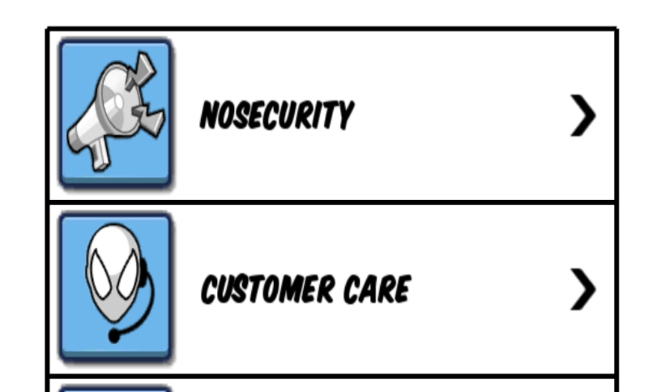
It would be tedious to manually count the string lenghts and then properly encode them before re-inserting them back into spiderman_text_en, so I wrote a quick Python script to perform that substitution for me. I found that the string “NEWS” appears in the game menu, and corresponds to the key STATICUI.GAMELOFT_CONNECT_NEWS.text inside the strings file. I then ran my script and modified the string to instead say “NoSecurity”:
python3 string-modifier.py --backup strings/spiderman_text_en --modify "STATICUI.GAMELOFT_CONNECT_NEWS.text" --value "NoSecurity"
Having modified the English translation file, I simply repackaged everything back into a regular ZIP archive with the Mac zip CLI utility:
zip -r file000021.dat spiderman_text_*
And after replacing file000021.dat inside the SD card with a modified file and booting into the game, I could see my changes reflected in the menu UI:
Fixing Progression
Earlier in this blogpost I mentioned that progression was broken in version 4.6.0c. Specifically the inventory power and player level values would prevent players from playing higher tier missions. Lucky for us, these values are all defined inside GameData.json, which we can now freely modify. Let’s look at a portion of a single mission’s configuration inside GameData.json:
"InternalType": 14,
"MissionID": 0,
"PowerRequired": 1.0,
"EnergyRequired": 1,
"TierRequired": "Rookie",
"EditorName": "TUTORIAL_ISSUE_01_M_00",
It is quite obvious what we need to patch here - PowerRequired to 0.0, and EnergyRequired to 0. I applied the patch, checked the mission in-game and confirmed that the energy cost was gone, and the power level requirement was nowhere to be found. Case closed.
Mission Editing
Being able to edit the GameData.json file opens up a lot of interesting modding opportunities. We’ve already changed the mission configurations when fixing progression to remove level, energy and power requirements, but there are numerous other fields we could mess with for each mission:
"Type": "Boss",
"StartSegmentName": "start.lv",
"StartBGMName": "m_tutorial",
"StartAmbName": "City_Ambiance",
"StartCinematicList": "30011",
"LocalizationID": "M1",
"LevelIndex": 1,
"Weather": 20040,
Most of these fields just control surface-level mission properties like music and weather. The real magic lies in LevelIndex - this single value determines the entire mission’s structure, from level layouts to which bosses appear. The game uses this index to procedurally generate levels based on developer configurations, rather than hardcoding the level data directly in GameData.json.
Each story mission and even event has its own unique level index, which determines its level layout and bosses. All story levels are now playable in the game thanks to our progression fix, but events were time limited during the game’s lifespan, and with the servers offline there is no opportunity to launch an event level. But what is stopping us from changing the index of a mission that is present in the game to an index of an event that is no longer playable, but still present in the game files?
As it turns out, nothing at all. Lucky for us, all missions within the GameData.json file are nicely labeled with the EditorName value, and let us easily identify what the mission contains, such as EVENT_SINISTER6, ISSUE_05_B5, EVENT_ULTIMATE_MORLUN, etc. At the end of its lifespan the game had a time limited event where players got a chance to fight Thanos, and I really wanted to make it playable again, so I found a mission named Thanos_HC_BOSS_EVENT_ENEMYKILLS, took its LevelIndex value of 340 and overwrote the index of the first playable mission in the game. And just like that, he’s back:

Actually controlling the level index was huge, and opened up a lot of possibilities for bringing back either cut, or time-limited content into the game. But since many of these levels were never designed for story mode, they completely lack any narrative via pre-game dialogues. Normally when you start a mission, you get a briefing from Nick Fury, and maybe a short exchange between characters, comic-book style, and these are the main way the game conveyed its story. I set out to mod those as well.
Back in GameData.json all story missions have the LocalizationId value, which is normally a short string such as I3_B5 (Issue 3, Boss 5). Based on the value’s name, I decided to look at the localization strings that we’ve modified earlier within spiderman_text_en. And after a simple search I immediately spotted the mission intro strings in an interesting format:
MISSION.INTRO_I3_B5.text: {^231065:dialog_bring_it_on: So you've managed to survive this long, have you?}{^200000:explain: Well, you know, it's all I can do. YOLO!}{^231065:dialog_attack: I've come for the Iso-8. Give it to me and I'll kill you quickly.}{^200000:shrug: Well, ya see... the thing is... That was a trap!}{^200000:caution: The Iso-8 is safe, and now I'm going to take you down!}{^231065:dialog_lunge: Nobody lies to me! YOU'LL PAY FOR THIS!}
I was surprised to find out that these pre-game dialogues are defined in their entirety within localization files. Presumably the id value such as 200000 identifies the speaker (Spider-Man), and the next string such as shrug sets the pose in which the speaker is shown. Knowing this was the format, I decided to edit the intro dialogue for the first mission using my string-modifier script from before:

Incredible. Now I knew that if I wanted to add narrative to a mission, I could do so by adding the following localization keys for male and female (as indicated by _F) players:
MISSION.TITLE_[LOCALIZATION_ID].text
MISSION.OBJECTIVE_[LOCALIZATION_ID].text
MISSION.INTRO_[LOCALIZATION_ID].text
MISSION.INTRO_[LOCALIZATION_ID]_F.text
MISSION.SUCCESS_[LOCALIZATION_ID].text
MISSION.SUCCESS_[LOCALIZATION_ID]_F.text
MISSION.FAIL_[LOCALIZATION_ID].text
MISSION.FAIL_[LOCALIZATION_ID]_F.text
This is great and all, but modifying these missions by editing GameData.json every time is a pain in the ass. I wish it was as easy as clicking “Install” in a menu somewhere, and having it modify the file for you. I shall address this with a mod menu soon.
Patching the Game
Back when I made my first Frida cheat, I realized that needing frida-tools and adb was a massive pain in the ass and a barrier for people using it. Most users just want to install and play - they don’t want to mess with command line tools or USB debugging. It wasn’t until someone took my script and embedded it with a Frida gadget inside the game’s APK that people started benefitting from it widely. Back then I wanted to eventually add a proper UI for my cheat, but I just did not have the skills yet. But I do now.
Hijacking JNI
First order of business - find a way to get our code executed. Normally game hackers will utilize something called “code caves”. Code caves are basically unused byte ranges within compiled binaries that can be written over to add custom code without breaking the binary’s structure. However, I did not want to bother with patching assembly, since I identified a much easier approach to achieve this. Remember the UI strings I changed earlier?

What’s interesting about these buttons is that they invoke Android functionality such as opening the browser or opening the Android embedded WebView browser to view a Gameloft web page. This seemingly insignificant piece of information actually tells us that the game is taking advantage of the Java Native Interface (JNI) to perform these actions. JNI is essentially a bridge that allows native code (C++) to call Java functions and vice-versa. Why bother with patching assembly when we can patch Java bytecode? Besides, Java can take full advantage of rich Android UI libraries and other functionality that takes native code jumping hoops to access.
I intercepted the game’s HTTP traffic with Burp Suite, noted down the URL being accessed, and then searched for it within the game’s decompiled Smali code. I found a match within the IGPFreemiumActivity class and upon a quick review of the code realized that it was starting a new activity - specifically opening a WebView browser in-game. Android Java code is event-driven, so when reviewing an activity’s code you must start at the constructor, and then review its onCreate method, since that gets invoked once a new instance of the activity is created. To confirm that I was examining the correct class and method I set up a simple Frida hook on the onCreate like this:
Java.perform(function() {
   console.log("[*] Script loaded");

   var activity = Java.use("com.gameloft.igp.IGPFreemiumActivity");

   activity.onCreate.implementation = function(bundle) {
       console.log("[+] onCreate called");
       console.log("    bundle: " + bundle);
       this.onCreate(bundle);
   };
});
And as expected, once i clicked on the “More Games” button in the game, the script triggered and confirmed that the IGPFreemiumActivity was created. Now that we know what exact Java code was being executed by the game through the JNI bridge, we can patch it and redirect execution to our own Java code - no code caves needed. But before we can redirect execution we actually need to write the Java code.
Custom Java
The first mod menu UI i wanted to add to the game was for modpack settings, where I could allow players to reinstall the mod or execute any other troubleshooting functions to fix their game installation. Creating a new view is actually extremely easy with Java and the default Android library. Below is the Settings.java file, which implements a simple Settings activity, which displays the text Hello World! to the screen when invoked with the buildMenu method. Notice that I’ve declared com.nosecurity as the package name - we will reference this value to later execute our code.
package com.nosecurity;

import android.app.Activity;
import android.view.View;
import android.widget.TextView;

public class Settings {
    private final Activity activity;

    public Settings(Activity activity) {
        this.activity = activity;
    }

    public View buildMenu() {
        TextView text = new TextView(activity);
        text.setText("Hello World!");
        return text;
    }
}
Now we just need to redirect the execution within the IGPFreemiumActivity that we identified earlier by patching its onCreate method. To ensure our UI is properly instantiated we first need to call the onCreate method of the Activity class via super to ensure that a new activity is created correctly. After that we need to create a new instance of the Settings class and then call the buildMenu method to create the UI view before then rendering it with the setContentView method. In Java this code would look like this:
public void onCreate(Bundle savedInstanceState) {
	super.onCreate(savedInstanceState);
	Settings settings = new Settings(this);
	View menuView = settings.buildMenu();
	setContentView(menuView);
}
When translating this Java code to Smali, we need to break down each operation into low-level instructions that work with registers instead of variables. Object creation becomes a two-step process with new-instance and constructor initialization, method calls explicitly list their parameters in registers (where p0 represents this), and return values must be manually moved into registers with move-result-object. Here’s the equivalent Smali implementation:
.method public onCreate(Landroid/os/Bundle;)V

	.locals 5

	.prologue

	const/4 v4, -0x1
	const/4 v1, 0x0

	invoke-super {p0, p1}, Landroid/app/Activity;->onCreate(Landroid/os/Bundle;)V

	new-instance v3, Lcom/nosecurity/Settings;

	invoke-direct {v3, p0}, Lcom/nosecurity/Settings;-><init>(Landroid/app/Activity;)V

	invoke-virtual {v3}, Lcom/nosecurity/Settings;->buildMenu()Landroid/view/View;

	move-result-object v2

	invoke-virtual {p0, v2}, Lcom/gameloft/igp/IGPFreemiumActivity;->setContentView(Landroid/view/View;)V

	return-void

.end method
Now that we’ve written our custom activity code and patched the Smali bytecode to make IGPFreemiumActivity instead execute our code, we must re-build the APK correctly. This process involves several steps, but I’ll describe them at a high-level for your understanding.
First we need to compile our custom Java code against the Android SDK into .class files using the javac CLI tool. Secondly, we must convert the .class files into the DEX (Dalvik Executable) bytecode, which can be achieved using the Android Studio d8 compiler tool that comes with the SDK. Since we’ve been working with Smali and modifying the decompiled DEX files, we need to then disassemble our resulting DEX files into Smali code using the baksmali tool that we previously used to dissassemble the APK. Once that is complete, we need to move the Smali files into the correct folder within the disassembled APK (com/nosecurity/) and then recompile everything with apktool.
This is too many steps to do manually, especially as we iterate over different classes, so I ended up writing a quick build.sh script to perform this and deploy it to my test device:
#!/bin/bash

rm -rf custom_java/*.class
rm -rf custom_dex/
rm -rf custom_smali/

# Compile Java files
javac -cp /Android/sdk/platforms/android-34/android.jar custom_java/*.java

# Convert all class files to dex
mkdir custom_dex/
d8 custom_java/*.class --output custom_dex/

# Convert dex to smali
java -jar ~/Tools/baksmali.jar d custom_dex/classes.dex -o custom_smali/

# Remove old smali files and copy new ones
rm -rf apk/prod/smali/com/nosecurity/
cp -r custom_smali/com/nosecurity apk/prod/smali/com/nosecurity/

# Rebuild the APK
java -jar ~/Tools/apktool.jar b apk/ --use-aapt2 --force-all

# Sign the APK
java -jar ~/Tools/uber-apk-signer.jar -a apk/dist/smu.apk --allowResign --overwrite --ks nosecurity.jks --ksPass [redacted] --ksAlias nosecurity --ksKeyPass [redacted]

# Deploy to the phone
adb install -r apk/dist/smu.apk
Once the build process is complete and the APK is deployed, we can witness the fruit of our labor - the Hello World message that is shown once we click the one UI button we hijacked:
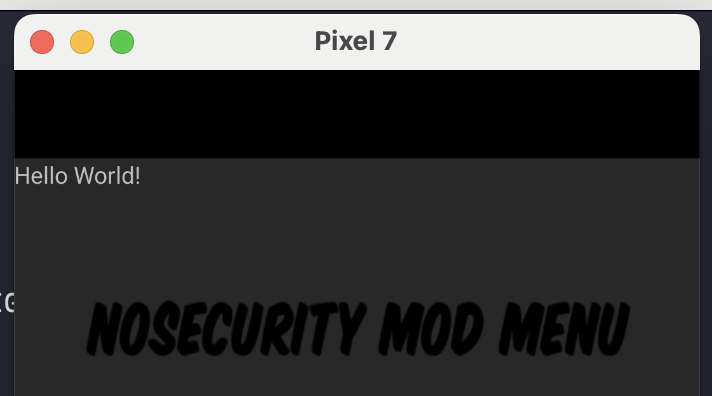
Android UI design is an entire job on its own, which I am not going to cover in this blog, but this section should at the very least have given you the core understanding of how to patch the game to instead invoke our own code via JNI.
Save Lambda
Once I figured out code patching for this game, I knew I needed to streamline the process of editing the game’s save file. Two problems stood in the way: players without root access couldn’t touch the save file in /data/, and implementing TEA decryption in Java would be a pain. The solution? Ship the user’s encryption key to a serverless AWS Lambda function that would return a pre-made save file encrypted just for them. No need for root access, no complex Java crypto code, and no server maintenance overhead.
If you aren’t familiar, Lambda esssentially allows you to execute the code of your choice within a cloud container that you do not need to manage. No overhead associated with deploying and configuring a virtual machine with a web server on top - you simply get a Python 3.12 environment that can execute your scripts upon an incoming HTTP request. You even get a VSCode IDE within your browser to develop and test your Lambda’s code. And best of all, it is AWS free tier eligible, so this setup cost me exactly 0 dollars.
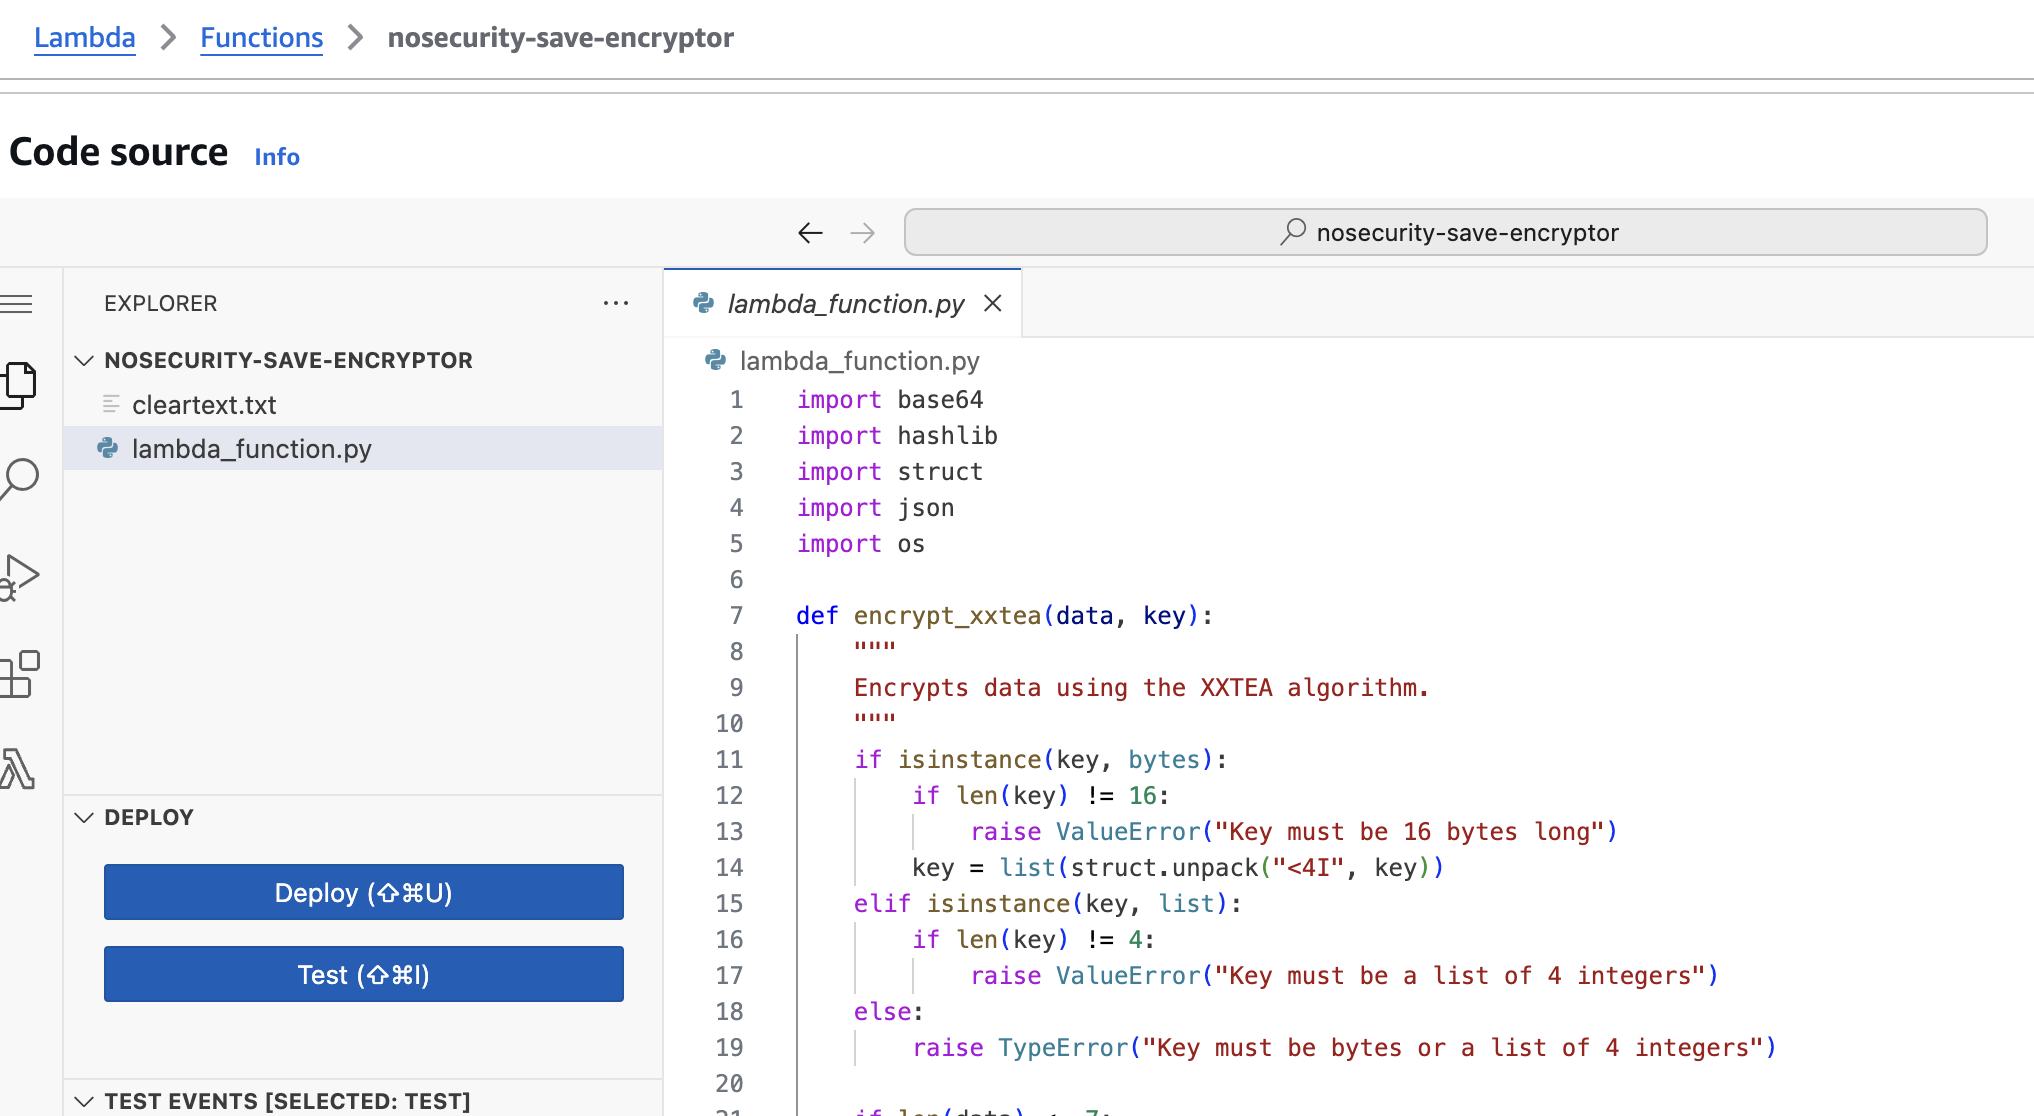
I took my existing TEA encryption script, removed its __main__ function and declared the lambda_handler needed to process the HTTP request, and retrieve the base64 encryption key from the client:
def lambda_handler(event, context):

	if 'body' in event:
		try:
			body = json.loads(event['body'])
		except:
			body = event['body']
	else:
		body = event

	if 'base64Key' not in body:
		return {'statusCode': 400, 'body': 'base64Key parameter is required'}

	base64_key = body['base64Key']
And to faciliate this approach on the client-side I created a new Installer class within the com.nosecurity package, where I first obtained the encryption key by reading the SQLite database using the android.database.sqlite package:
String dbPath = DATA_PATH + "../databases/gameloft_sharing";

SQLiteDatabase db = SQLiteDatabase.openDatabase(dbPath, null, 0);
Cursor cursor = db.rawQuery(
"SELECT value FROM glshare WHERE key = 'ANMP.GloftSIHM_GAIA_ENC_KEY_GLUID'",
null
);
And then made an HTTP request to the Lambda with the key before saving the returned save file contents to player.dat, overwriting the player’s empty save file with one that had every costume unlocked:
// Send the key to Lambda
URL url = new URL(LAMBDA_URL);
HttpURLConnection connection = (HttpURLConnection) url.openConnection();
connection.setRequestMethod("POST");
connection.setDoOutput(true);
connection.setRequestProperty("Content-Type", "application/json");

String jsonPayload = "{\"base64Key\": \"" + base64Key + "\"}";
logToFile("Sending payload to Lambda: " + jsonPayload);

try (OutputStreamWriter writer = new OutputStreamWriter(connection.getOutputStream())) {
	writer.write(jsonPayload);
	writer.flush();
}

int responseCode = connection.getResponseCode();
logToFile("Lambda response code: " + responseCode);
The final step to successfully patching the game was then hijacking its execution at the correct spot. I went back to the GameInstaller class within the game’s Smali code and inserted a call to my code right before the game loads in the libSpidermanI.so library, this way my code would only be invoked once, during the initial game install:
new-instance v1, Lcom/nosecurity/Installer;
invoke-direct {v1, p0}, Lcom/nosecurity/Installer;-><init>(Landroid/app/Activity;)V

const/4 v2, 0x0
invoke-virtual {v1, v2}, Lcom/nosecurity/Installer;->startInstall(Ljava/lang/Runnable;)V

const-string v0, "SpidermanI"
invoke-static {v0}, Ljava/lang/System;->loadLibrary(Ljava/lang/String;)V
I rebuilt the APK, deployed it to my phone, and confirmed that it launched with everything unlocked. Now that’s peak UX.
Mission Packs
As soon as I discovered that editing GameData.json allows us to mess with game mission definitions and switch levels around, I became obsessed with making that modding more accessible. Manual file editing is error-prone and tedious - one wrong character and you’ve corrupted your game files. Players needed a way to safely install and remove mission packs with just a few clicks. I began building this out by first establishing the missions.json file.
This file would live in an S3 bucket that I control, and be fetched by the game client to determine what mission packs are available to us. I chose mission packs as a basic unit for this architecture, since some unplayable missions follow an entire storyline, like the Symbiote World expansion, which introduced a whopping 16 missions to the game.
The mission pack structure within the JSON file is rather simple, and exists merely to encapsulate an array of mission objects in the same format as they exist within GameData.json, except without the Issue and Episode fields:
- Mission Pack ID
- Pack Title
- Pack Author
- Pack Description
- Pack Banner Image
- Pack Missions
- Type
- Editor Name
LevelIndex- Objectives
- etc.
The reason why Issue and Episode fields are absent from mission definitions is because they determine where these missions are accessed in the game story menu. This is really the key point that makes our whole setup work - we need to be able to take a variable number of missions, and then replace the first N missions within the GameData.json file with them, while maintaing an ability to roll the changes back arbitrarily. I had to get creative to achieve this, because missions are not always sequential in the GameData.json file, so there needed to be a defined list of missions that we would replace. Since the file used the EditorName value to contain user-friendly mission names, I chose to rely on it for my replacement list:
private static final String[] MISSION_SLOTS = {
	"ISSUE_01_B_01",
	"ISSUE_01_M_01",
	"ISSUE_01_M_02",
	"ISSUE_01_M_04",
	...
};
Once the client-side Java received a request to install a mission pack with 4 missions, it would take the first 4 values within the MISSION_SLOTS array and set their Issue and Episode values to 0, freeing up their positions in the story mission selection menu, and then giving their old values over to the 4 missions to be installed, which then get appended to the end of the missions array within GameData.json. And to subsequently reverse this operation we would simply need to grab the 4 appended missions by their EditorName found within the missions.json file, and move their Issue and Episode values over to the first 4 missions identified by names in the MISSION_SLOTS array.
I wrapped all these JSON gymnastics in a pretty-looking UI, and ended up with a beatiful mod menu that made previously unplayable levels accessible to players once again:

Decompressing Files
So between save game editing and a mission selection mod menu I’ve made basically all of the game’s cut or otherwise inaccessible content accessible again. My mission here is almost done - as my last major contribution to this community I wanted to make it possible for them to modify the game’s core assets. But first we needed to crack Gameloft’s proprietary archive format that locked away all the models, textures, and level data.
Unpacking the Bars
You may remember from an earlier section that this game stored its assets on the device SD card within .dat files, which at least in the case of translation files ended up being a simple ZIP archive. The more interesting asset files such as models, textures and levels were not as easily accessible. Upon closer inspection of these files we no longer see a familiar ZIP format, however, we do see a table-of-contents structure:
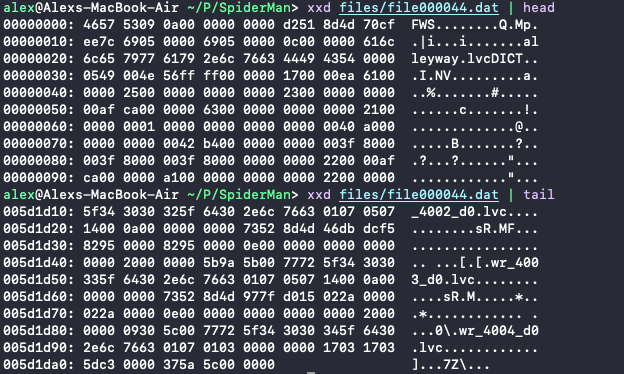
I opened the levels archive in a hex editor and started manually examining the structure of it. The first thing I immediately noticed is that the files were glued together within the archive in a seemingly uncompressed format, because they all followed a similar format with strings at the end, all of which were intact, and I could even see that all level files started with the DICT magic bytes, which was preceded by their filename.
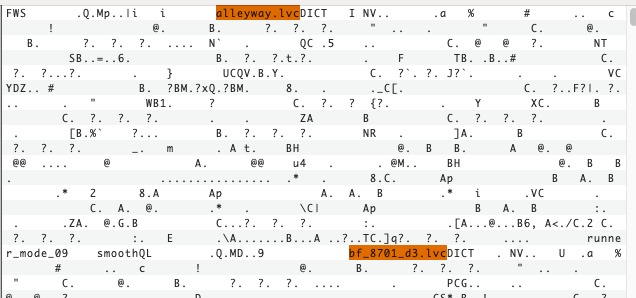
I then honed in on the table-of-contents at the end of the file and noticed the same filenames as before, surrounded by a varied non-string byte values for each file:
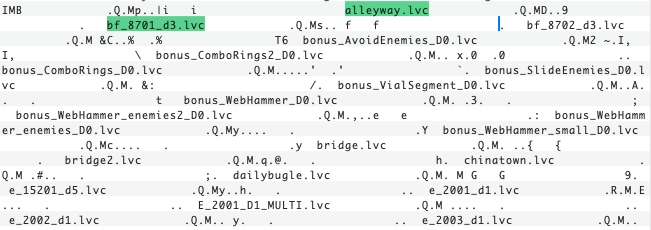
The first step was figuring out where exactly this table-of-contents began. This was pretty easy, because just through manual review I noticed a repeating set of bytes, which appeared between every record, and appeared nowhere else in the file outside of the TOC:
01070507 14000A00 00000000
So I split the TOC into records and started examining the very first record for the alleyway.lvc file we saw earlier. The filename was in fact at the end of this record, and was preceded by a fix number of varied bytes:
D2518D4D c 69050000 69050000 0C000000 00000000 00002000 00000000 0000 alleyway.lvc
My methodology for identifying all of these fields was simple - take 8, 4 or 2 byte chunks (whichever makes sense for the value), then see if it holds any significance in both little-endian and big-endian. For example, does it appear anywhere else? Is it a fixed value? Does its decimal value appear anywhere? How does it differ between records? Is it incrementing?
So step by step I figured most of them out. I saw that D251 appeared within most of the records, but at some point it incremented to D252. And upon examination of other .bar files I realized that this ID was being used across all packaged game assets. It was clear to me that 8D4D was the asset type, because it correlated heavily with the file extension within the file name. For example, 8D4D always appeared for .lvc files, while 4c49 was used for the vast majority of TGA texture files. 70CFEE7C was neither incrementing, nor ever the same for any of the records, possibly indicating that it’s a checksum or hash of some sort, but I never quite figured out which algorithm. 69050000 appeared twice in a row and when switched in endianness, quite clearly represented the byte length of its respective file within the archive. 0C000000 was also quite clearly the length of the filename, once converted to little endian, and finally, 00000000000020000000 appeared to be a fixed separator that appeared in every record. The only remaining field that was a mystery was 00000000 for alleyway.lvc, but other than that we mostly have this format figured out:
[asset id] [asset type] [checksum] [size 1] [size 2] [filename length] [separator] 0000 0000 [filename]
I looked at the second record and saw that its value just before the filename was 93050000, and all subsequent records had an increasing value within this field. Since it was not uniformally incremental, it likely wasn’t an ID. I converted it to little endian and ended up with 00000593, which seemed like a weirdly specific value that was suspiciously close to 00000569, which was the previous file’s length. This left only one possible option - this was an offset. And indeed, I navigated to this offset in the archive and arrived right at the beginning of the second file’s header, just before the filename:
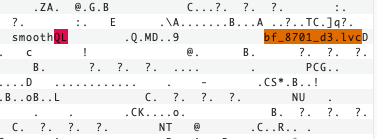
I examined offsets for several subsequent files and confirmed that all of them started with the magic bytes of 514C, except the very first file, which used 4657, which was the same magic bytes as all other .dat files. This is very relevant for when we re-pack this archive later on. For now, I had more than enough information to begin parsing this archive format and list the files inside using a custom Python script:
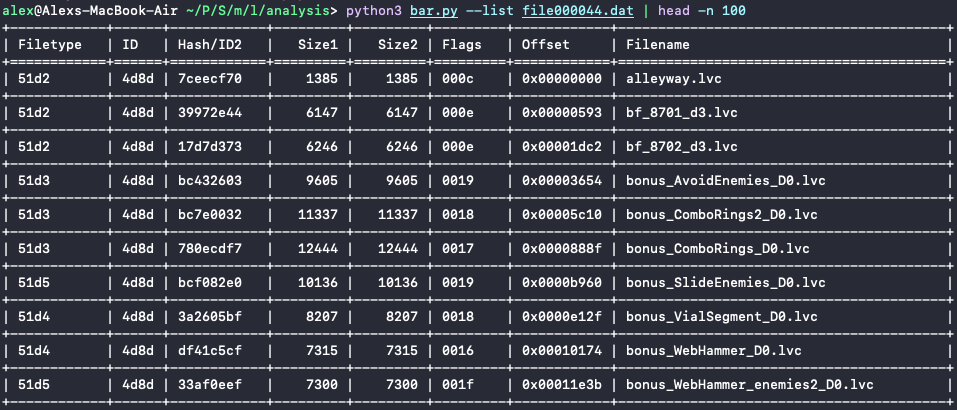
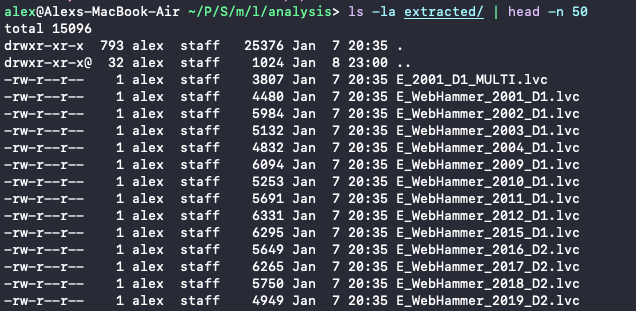
Since we know exactly the offsets at which files appear within the archive, simply splitting the archive (minus the TOC) at those addresses would be enough to extract everything inside. So after adding this minimal change to my script I ended up with a folder containing all the level files within the game:
Level Editing
I began reviewing the extracted .lvc files and figured out they mostly represent ID values and floating point coordinates for object placement, such as enemies, coins, and coordinates navigated to by bosses in the game. But here’s where it gets interesting - this game is an endless runner that procedurally generates its levels, meaning it dynamically combines level segments rather than using static layouts. So there had to be some master definition file that told the game which segments to use and how to combine them. But these rules were nowhere to be found in the extracted level files.
The extracted folder does contain a few mysterios binary files - gol.bin, ggol.bin and levels.bin. Based on my conversations with former developers for this game, these files represent the compiled level and object configurations created by Gameloft. I dug deeper within the game code and examined what exactly it did with these files. You may wonder why these had to be binary instead of something like JSON similar to GameData.json, but the answer is very simple - the game loads these files into memory and uses their byte values for real-time level generation, for which speed is critical. That being said, there still has to be an index that would map the byte values to the names or IDs of the objects being set up. Thankfully, these .bin files come with a big list of strings at the end, which is our first clue as to their structure:
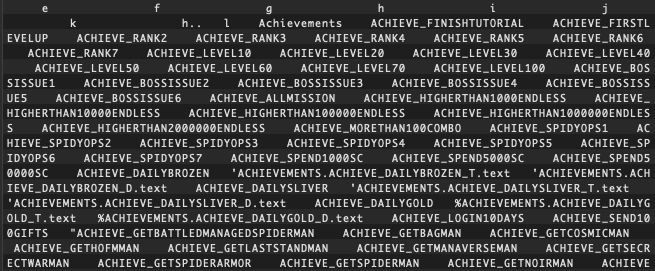
Once we examine each of these strings and their surrounding bytes closer, we can spot that they are all delimited with 0000 and are all prefixed with their length:
0016 ACHIEVE_FINISHTUTORIAL
0014 ACHIEVE_FIRSTLEVELUP
000D ACHIEVE_RANK2
Once I discovered that the 000592AE value immediately following the DICT magic bytes of the file represented an offset to the beginning of the strings section, I wrote a quick python script to parse it and began examining the output for any interesting patterns and other indicators of the overall file structure. I gotta say - very funny, Gameloft.

So I sat there thinking about this list of strings - they only contain the length, and their offsets seem to be worthless, at least I couldn’t correlate their appearances in any coherent way - how could the game be referencing these strings in the rest of this binary file? And then it hit me - if these strings have no visible IDs, what if their order in the strings list is their exact ID? I decided to test this by messing with the tutorial level. I knew that the game files contained a tuto_01.lvc file, without which, the tutorial level would crash, as I found out by deleting it. I saw a reference to this filename within the ggol.bin strings section with the ID of 0456, indicating that it was the 1110’th string in the list:
ID: 0456 | Offset: 0000645a | Length: 10 | String: tuto_01.lv
I then searched the ggol.bin hexdump for this value and found a sequence of byte records with incrementing IDs beginning with tuto_01:
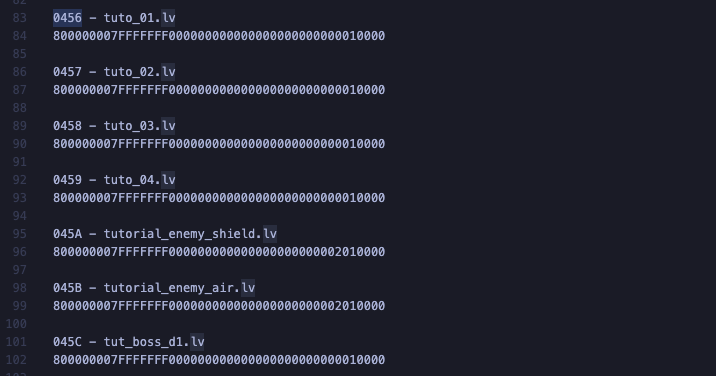
Knowing that these were probably level segment definitions, I replaced the ID of tuto_01 with zeroes, repacked the level archive, and placed it in the game’s SD card. I booted into the game just fine, and tried to play a few levels. Everything worked just fine until I opened the game’s tutorial level and observed a crash. This was an indicator that I hit a bullseye with this ID.
This victory was short-lived, however, because the byte records associated with these level segment IDs were near-identical, and I could not identify a pattern of their usage based on their order within this segment index, so I changed my approach. I went back to GameData.json and saw that the highest LevelIndex was 345. I added a custom mission with the index of 346, but it crashed the game, indicating that there truly were only 345 levels in the game. I then searched for the hex representation of 345 (0159) within ggol.bin and found a single match. I overwrote this value with 0001 and got into the game. I played through the first level just fine, but every level afterwards caused a crash. I then changed it to 0005 and noticed that all levels after 5 were crashing - clearly I found where the level count is defined, possibly indicating the start of the level definitions.
I looked at the bytes following this level count and found that they defined almost around 2800 separate configurations, delimited by the 0CCD569F bytes. Fully mapping out this format would take a very long time, but at the very least I figured out the rough layout of levels:
- Metadata definitions for the level (e.g. the bosses that appear)
- Fixed level segments begin
- Segment type (enter, exit, transition, etc.)
- Segment ID (different from string ID values)
- Random level segments pool
- Segment type, Segment ID
- Segment probability (float)
For example, here is a fixed level segment from the game’s tutorial level:
00000002 00000002 00000001 0000 002 00000000 01000000
The first set of bytes (00000002) represents the type of segment. The second set of bytes (00000002) represent the specific segment ID within that category. Through trial and error I discovered that the 00000009 segment type identified transitional segments that take you from one level area to another. I hardcoded the transitional segment type within this tutorial segment and iterated through the segment IDs to find out the following transitions:
00000001- Boss fight terrain00000002- Mothership00000003- OsCorp00000004- Osborn Factory
This dive into the level format ended up being quite rewarding. By messing with these segment definitions, I gained the ability to modify existing levels and piece together custom ones. While fully mapping out every segment type, ID, and parameter would be another reverse engineering project in itself, I at least cracked open how the game builds its levels. What started as an intimidating binary format turned out to be a clever system where the devs could weave together fixed sequences with randomized segments. Maybe one day I’ll map out the rest, but for now, I’m pretty happy with being able to mess with the game’s locations and level flow as-is.
Conclusion
And with that, my Spider-Man Unlimited journey comes to an end. What started as a curious attempt to practice reverse engineering turned into a year-long mission to crack open and document every aspect of this game. Along the way, I not only learned more than I could have imagined about mobile security, but helped revive an entire community and let new players experience a game that was nearly lost to time. More appsec and game hacking adventures to come - stay tuned.